A guide to making your Power BI custom connector for Power Apps and Power Automate

Power BI REST APIs provide a flexible alternative to govern and automate some of the tasks a user or administrator performs. One of the best low-code automation options is Power Apps and Power Automate. Power Apps has a handful of pre-built Power BI connectors that barely scratches the functionality Power BI REST API offers.
This article will build a custom connector to take advantage of the complete set of the Power BI REST APIs in Power Apps and Power Automate.
Custom connectors in Power Apps and Power Automate address the scenarios where we want to communicate to a resource or service (read APIs) that doesn’t have a pre-built out-of-the-box connector available. Creating a custom connector involves building and securing the API, describing the API, defining the connector actions, and using the connector.
Custom connectors require an individual or pay-as-you-go Power Apps/Automate license and are not included in any Office 365 license. Refer licensing guide for details.
In our case, we don’t have to build and secure the resource API. However, we have to define the correct security mechanism to connect to the Power BI APIs. Power BI service and APIs are protected with the Azure AD authentication, and we will use the same to authenticate our users and access the APIs. We will achieve this with OAuth 2.0 authorization code flow.
Prerequisites
Let’s start creating and setting up a service principal (Azure AD App) with appropriate permissions. This service principal will impersonate the logged-in user to access the Power BI APIs.
Register a new Azure AD app
Follow these steps to create the app registration:
- First, sign in to the Azure portal.
- If you have access to multiple tenants, ensure the right tenant in which you want to register the application.
- Search for and select Azure Active Directory in the Azure Portal.
- Then, under Manage, select App registrations > New registration.
- Enter a Name for your application.
- Specify who can use the application, sometimes called its sign-in audience.
- Notice the Redirect URI section. You’ll configure a redirect URI after setting up the security for your custom connector.
- Select Register to complete the initial app registration.
- Note down the Application (client) ID from the Overview page. We will need it later.

Add a client secret to your app
Also called an application password, a client secret is a string value your app can use to identify itself. Follow these steps:
- Under Manage, select Certificates & secrets > Client secrets > New client secret.
- Add a description of your client’s secret.
- Select an expiration for the secret or specify a custom lifetime and select Add.
- Record the secret’s value on a notepad to be used later in the custom connector. This secret value is never displayed again after you leave this page.

Configure the API permissions for the app
We need to specify the permissions the app will receive from a signed-in user (custom connector end-user). The app will not be allowed to perform an action for which it hasn’t received approval from the user (granting approval by the user to the app is known as consent). A developer defines the permissions and the scope of permissions the app will receive in the Azure AD registration. The end-user will be prompted to consent to these permissions while using the end product.
Pro tip: Your organization might have a different policy on granting consent to the apps. Reach out to your AAD admin to clarify and get consent on behalf of your organization for a smooth end-user experience.
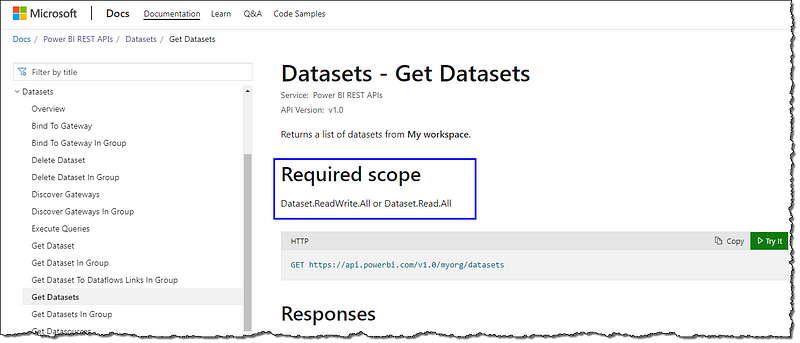
You must specify all the scopes of the permissions your app shall receive from the user, considering all the functionalities you plan to build in your Power Apps/Automate app. A great starting point is the Power BI REST API documentation and looking for the applicable scope. For example, if you plan to build a feature to get the list of all the datasets from the logged-in user’s personal workspace, then your Azure AD should specify the Dataset.ReadWrite.All or Dataset.Read.All in the app’s delegated permissions.
For delegated permissions, your app can never have more privileges than the signed-in user. In short, your app can’t do anything that a signed-in user is not allowed to do.
Follow these steps to set up the permissions and scopes:
- Under Manage, select API permissions > Add a permission > Power BI Service (under Microsoft APIs).
- Select Delegated permissions.
- Select
Dataset.Read.Allunder Dataset permissions (select all the appropriate permissions your app should receive) and select Add permissions. - Follow your organization’s process to get Azure AD admin’s approval for your app.


Add a Redirect URI
A redirect URI is where the AAD redirects a user’s client and sends security tokens after authentication. Skip this step for now and return after you’ve configured your custom connector’s security and follow these steps:
- Under Manage, select Authentication > Platform configurations > Add a platform.
- On the Configure platforms blade, select the Web tile.
- On the Configure Web, enter the Redirect URL you’ve copied from the custom connector Security configuration page and select Configure to complete the platform configuration.


Custom Connector
Create a new Custom Connector
There are multiple approaches to creating a custom connector. The most straightforward and fastest method is to create a connector from the OpenAPI definition (formerly known as a Swagger file) or from a Postman collection. The swagger file for Power BI REST APIs is available on GitHub, and we will use the swagger file for our connector. You can find an unofficial Postman collection for Power BI APIs here.
Follow these steps:
- Scoot over to make.powerapps.com or flow.microsoft.com.
- In the navigation pane, select Data > Custom connectors.
- Select New custom connector, then choose Import an OpenAPI from URL.
- Enter a name for the connector, raw swagger file URL from GitHub, Import, and Continue.

Fill in the general details
On the General page, you can set an icon, icon background color, and a description that will be visible to your users when they make a connection for the connector. Leave the Scheme and Host details untouched. Move on to the Security page.

Specify authentication
The security page determines how your connector will access the API and the authentication mechanism. Fill in the details as follows and select Create connector:
- Authentication type: OAuth 2.0
- Identity Provider: Azure Active Directory
- Client id: Azure AD app id that we’ve created earlier
- Client secret: Client secret of the Azure AD app that we’ve created earlier
- Resource URL: https://analysis.windows.net/powerbi/api
- Scope: https://analysis.windows.net/powerbi/api/.default

The page will reload, and a Redirect URL will be populated (https://global.consent.azure-apim.net/redirect). Copy the redirect URL, head over to your Azure AD app, and add as the Redirect URI (the step you skipped earlier).
Review the connector definition
If you want to look at the actions available at your disposal, then take a look through the Definition tab; that’s where all the actions are listed. You can also review, remove or add actions as you wish.
Test the connector
Next, select the Test > New connection to create a connection for our new connector. Finally, a pop-up with a Create button will guide you (and users) to log in to your organization account and consent to the app permissions. It’s worth mentioning that the user consent experience may vary based on your organization’s consent policies.

If everything goes right, you’ll be redirected to the Connections page, and a new connection will be available for your custom connector. On the Custom Connectors page, you can see your new connector.

Test with a Flow
Your brand new Power BI connector is ready; let’s test it quickly by creating a Flow and executing a REST call.
- In the navigation pane, select Flows > New flow > Instant cloud flow.
- Give your flow a name, choose the manual trigger, and Create.
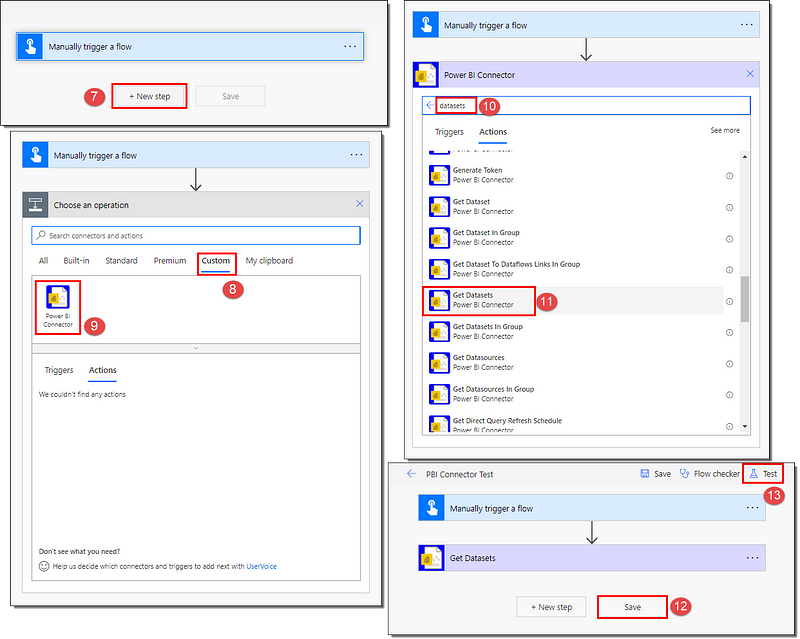
- On the flow creation page, add a New step and find your Power BI connector under the Custom tab.
- Search for the datasets and select Get Datasets from the Actions.
- Save your flow and proceed to Test the flow Manually.
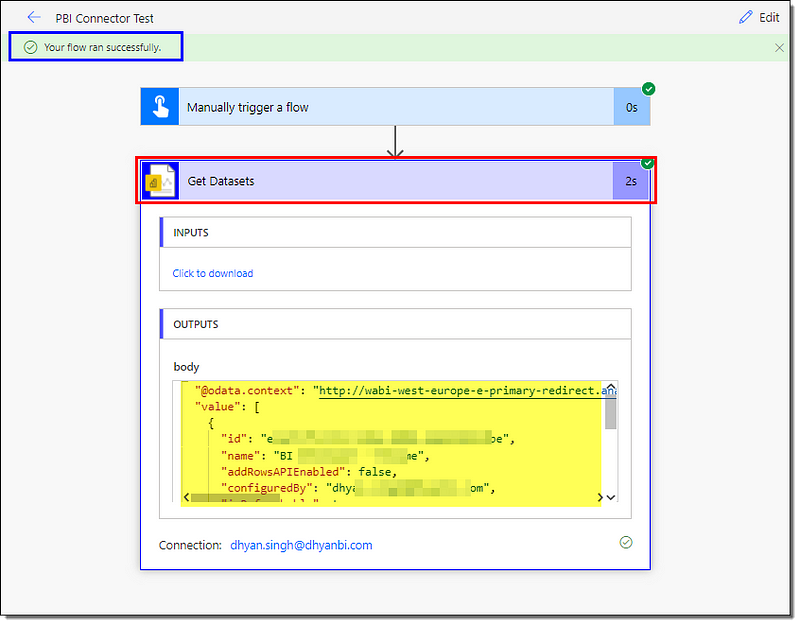
- Wait for the completion of the flow; a green banner will confirm a successful run.
- Click on the Get Datasets action to see the REST response.

That’s all, folks. We’ve created and tested a brand new Power Apps custom connector for Power BI REST APIs. We’ll be thrilled to hear about the use-cases of your new Power BI connector in the Power Apps. Let us know what you plan to automate to make your users’ or admins’ jobs easier.
Summary
We learned how to set up an Azure AD app with permissions and create a brand new custom connector in Power Apps. We created a connector to connect to Power BI and executed and reviewed a sample action and response.
Next Steps
It’s easy to make a custom connector if you’ve got an OpenAPI definition file or Postman collection handy. But how do we go about creating a custom connector from scratch? Read on to find out.
Run into problems? We’ve got a comprehensive article to cover the frequent errors and issues. Take a look.

Leave a comment