Developing a bare minimum REST API for Azure PostgreSQL Database using Azure Functions with Node.js in Azure Portal

Azure Functions is a serverless computing service running on Azure’s cloud-hosted execution environment. Azure Functions lets us run auto-scaled, event-triggered code on an abstracted underlying hosting environment.
An everyday use case scenario for Azure Functions is to perform work in response to an event and when that work can be completed quickly, typically in seconds. The on-demand execution feature makes Azure Functions a suitable candidate for developing REST APIs.
This article will create a stateless HTTP triggered RESTful Azure Functions app with Node.js to perform read operations on an Azure PostgreSQL database and return the results as a JSON object. We will look at developing a REST-style Azure Functions app using Azure Portal and Kudu.
Prerequisites
- An active Microsoft Azure subscription
- Azure Database for PostgreSQL
Let’s begin by creating an Azure Function App. Sign in to the Azure Portal, and create a Node.js function app.

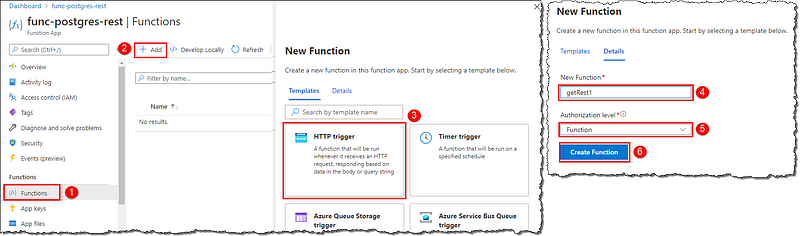
Wait for the Notification that the Function App has been created. Open the newly created Function App in the Azure portal. Click Functions, then the “+ Add” button near the top of the page. On the New Function blade, notice all the functions you could build and then click the HTTP trigger. On the Details page, give your function a name and set the Authorization level as Function.
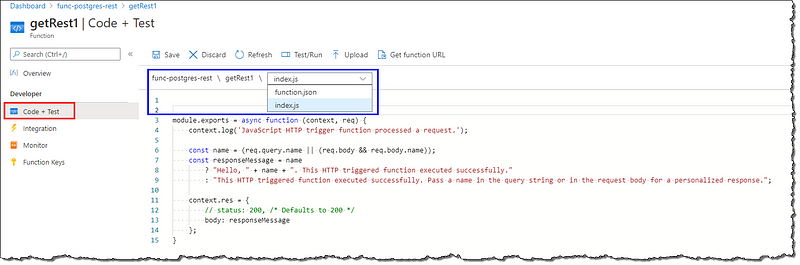
Your new getRest1 function has been created. Click on the Code + Test. Notice the code is ready to run for an HTTP request and log information. We will replace this code with our code in a while. Take a moment to switch the files from the dropdown and go through the content.
The Lessons- JavaScript basics for Azure Functions
Before we begin writing the code, let’s go through some immediately relevant basic concepts to create our Node.js app.
Folder Structure
Each function you create has a folder with its Node.js code file (.js) and a binding configuration file (function.json). The name of function.json‘s parent directory is always the name of your function. At the root of the function app, we have a shared host.json file to configure the function app. Right now, our function app has the following structure:
func-postgres-rest
 | - getRest1
 | | - index.js
 | | - function.json
 | - host.json
If you’re wondering where is our host.json located, you’re thinking in the right direction. We will get to it at a later point.
Exported Function
If you paid attention to the function code in the previous step, you might have noticed our function is an exported function. The exported function executes when it is triggered. A trigger defines how the function is invoked, and a function must have precisely one trigger. Triggers are configured in the function.json; in our case, the trigger is HTTP.
Functions must be exported using module.exports or exports. Function runtime expects to find an exported function in the index.js (aka entry point). Your exported function should be the only export from its file, or the export should be named as run or index. However, it’s possible to configure the entry point to suit your needs.
Our function is always passed a context object and a few other arguments on execution. The context object is always the first argument and is used to receive and send binding data, logging, and communicating with the function runtime.
Bindings
Binding to a function is a way of declaratively connecting another resource to the function; bindings may be connected as input bindings, output bindings, or both. Data from bindings are provided to the function as parameters. Bindings are configured and defined in a function’s function.json. Default bindings in our function.json looks, as shown below, we will change it shortly.

Application Settings & Environment Variables
Each function app has global configuration options “application settings” that affect all functions in a function app. Application settings are exposed as environment variables during execution. Application Settings are encrypted at rest and transmitted over an encrypted channel, making them ideal candidates to store our credentials and keys. Environment variables make it possible to connect to resources and services without revealing connection secrets. We can access the environment variables in our code using process.env["APPLICATION_SETTING_NAME"]
The Action- A bare minimum app
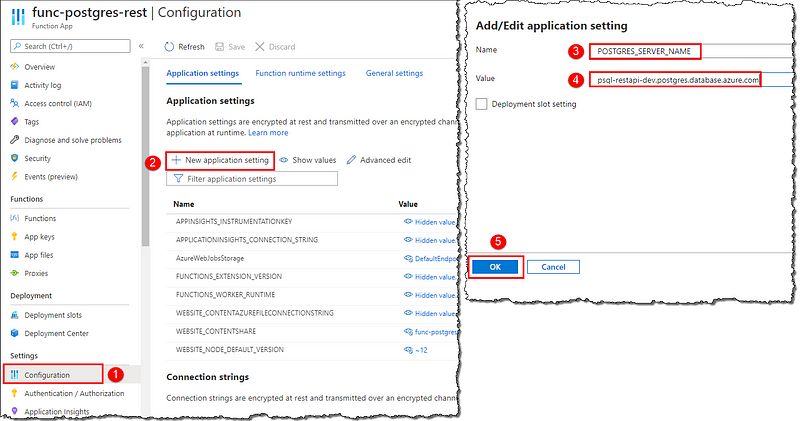
That’s enough learning for now; let’s jump to the action. First up, we will store our PostgreSQL connection details viz. server name, username, and password as application settings. The steps are shown below for storing server name, repeat for the other two. Notice, by default; all available application settings are hidden. Hit the Save icon when done and navigate to your function code i.e. index.js.
The server name can be found on your Azure PostgreSQL instance’s Overview page.

We will use the node-postgres (pg) library to connect and query the database. The first few lines are to import the dependencies, followed by defining a configuration object to hold the whereabouts and credentials to connect to the server. We will execute a SELECT statement against the database and return the result as JSON. The full code is shown below. Don’t forget to Save your changes; Azure Portal doesn’t support auto saving yet.
// Azure Function: Node.js code to read PostgreSQL data and return results as JSON
// Author: Dhyanendra Singh Rathore

// Import the pg (node-postgres) library
const pg = require('pg');

// Entry point of the function
module.exports = async function(context, req) {

    // Define variables to store connection details and credentials
    const config = {
        host: process.env["POSTGRES_SERVER_NAME"],
        user: process.env["POSTGRES_USER"],
        password: process.env["POSTGRES_USER_PASS"],
        database: 'iso3166',
        port: 5432,
        ssl: true
    };

    // Create query to execute against the database
    const querySpec = {
        text: 'SELECT * FROM public.subcountry'
    }

    try {
        // Create a pool of connections
        const pool = new pg.Pool(config);

        // Get a new client connection from the pool
        const client = await pool.connect();

        // Execute the query against the client
        const result = await client.query(querySpec);

        // Release the connection
        client.release();

        // Return the query resuls back to the caller as JSON
        context.res = {
            status: 200,
            isRaw: true,
            body: result.rows,
            headers: {
                'Content-Type': 'application/json'
            }
        };
    } catch (err) {
        context.log(err.message);
    }
}
Further reading on node-postgres
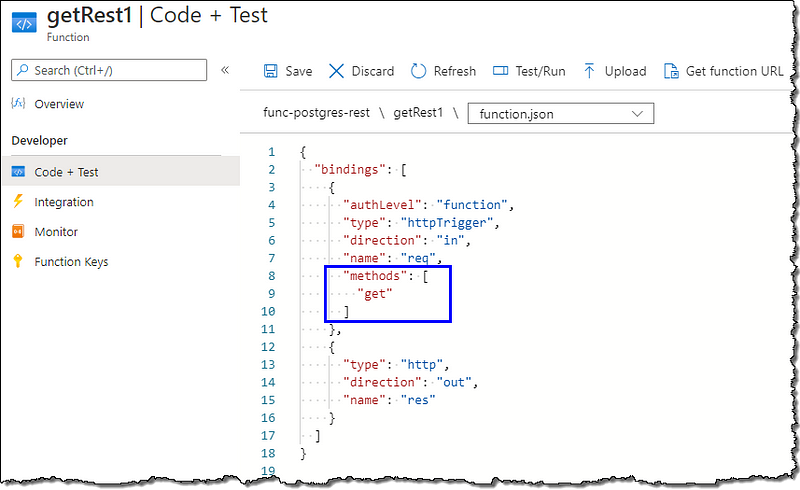
We want to perform only the GET operations and must disable our function from executing other operations. Switch to the function.json and ensure we have only get in the methods.
Kudu
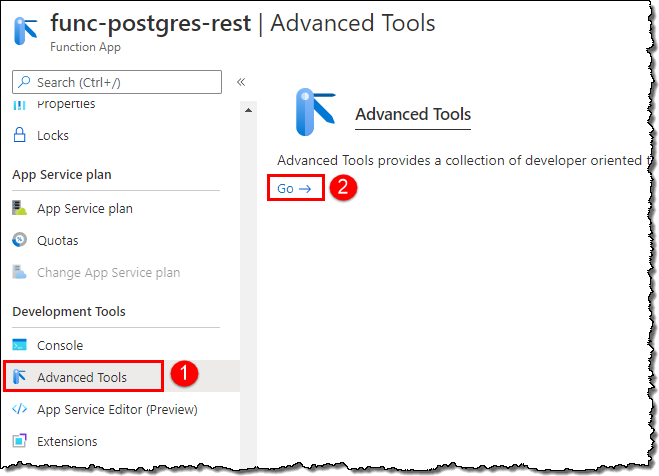
Navigate to your function app and locate Advanced Tools. We will launch Kudu from here. Alternatively, you can also launch Kudu by browsing to the SCM endpoint for your function app: https://<myfunctionapp>.scm.azurewebsites.net/
Take a moment to go through all the available options on the landing page. Move to Debug Console > CMD. Navigate to \site\wwwroot; our function app resides here along with our host.json.
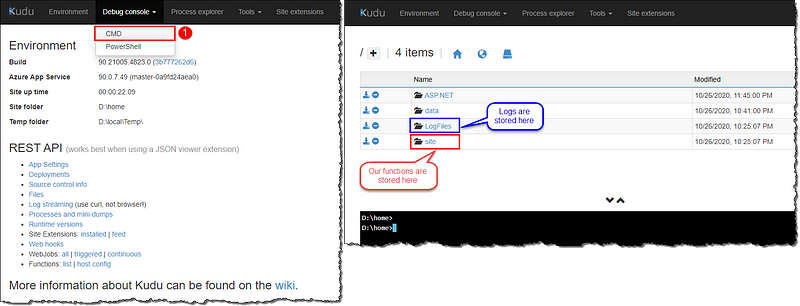
It’s time to install the required libraries and create a package.json file. Run the below commands one after the other to create a package.json for our app and install the node-postgres library. Follow the instructions on the terminal and provide the details; alternatively, you can create a package.json with default values by hitting Enter for every line. Notice the generated new files after executing both the commands. We will return here later to customize the URL of our app.
# npm init
# npm install pg
Further reading on Kudu
Testing
We’re all set here. Head back to your function; it’s time to test our code. Click on Test/Run on your function’s Code + Test page. Set the HTTP method to GET and click Run. The output will be available and displayed as JSON.


At this point, your app is ready to be called (read triggered) by a browser REST add-on or as a vanilla URL from the address bar. You can get the URL to your function from the Code + Test page.


A REST-style App
We promised to build a RESTful app, didn’t we? We will perform a few more tasks to give our app the REST feel.
API Endpoint (Route)
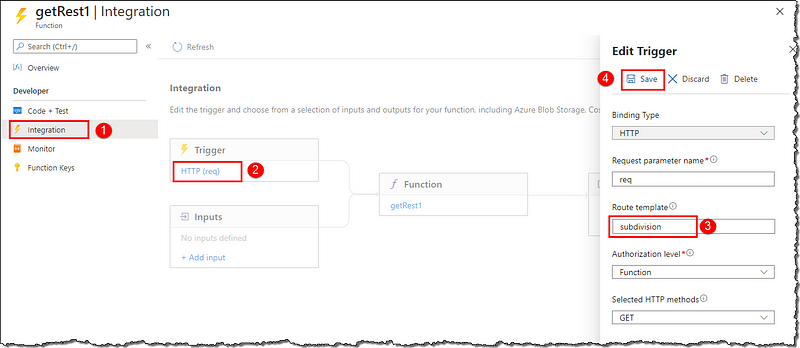
Head to your function and locate the Integration option. Click on the Trigger; on the Edit Trigger blade, fill a Route template name. This name can be anything, this route will represent your function to the world, and the function will execute only if this route is present in the URL. Route information will be available in your function.json after you hit Save. Alternatively, you can directly add or edit the route information in your function.json.

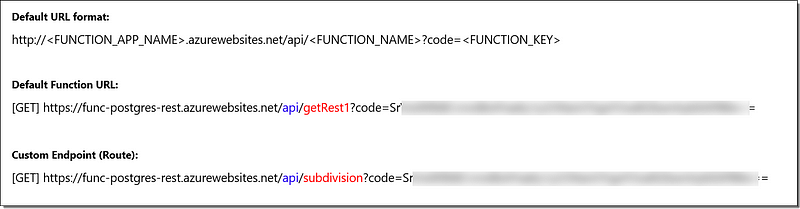
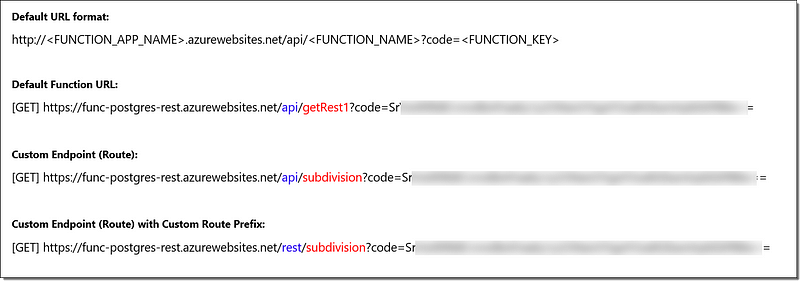
Why are we doing this? Because we can have multiple functions responding to GET requests in our app separated, identifiable, and accessible via their route. This route represents the resource exposed by our API, appearing to be a single entity to the callers. Let’s compare how the URL changed. Get the URL to your function from the Code + Test page.
As a good practice always refresh your Code + Test page after making changes to any settings or files in Kudu.
Further reading on customizing endpoints
We can also customize the route-prefix in our function URL i.e./apito /restto represent our app’s nature. Route prefix is a global setting and applies at the app level. We need to add the below lines to ourhost.json.
"extensions": {
      "http": {
          "routePrefix": "rest"
      }
  }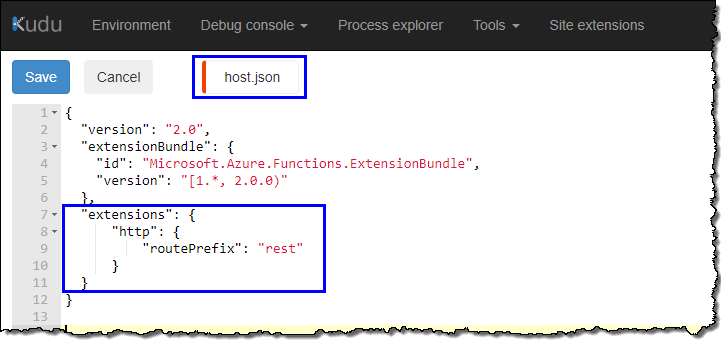
Quick recall: host.json can be found and edited in Kudu. Let’s compare the URLs one more time. Get the URL to your function from the Code + Test page.
Query Parameters
It’s time to make our app more useful by allowing the filtering of the query results. The caller can pass a value, and our app will filter the results for the given value. You can relate this to the WHERE clause of a PostgreSQL query. There are three different ways to pass variables to a REST API: path parameters, query parameters, and in the body of the HTTP request.
We will add the parameter country as a query string in the URL. We will modify our code in the index.js to look for the country parameter in the URL. If we find the parameter, we add a WHERE clause in our query against the database; contrarily, we return the whole set of rows without filtering.
Recommended reading on parameters
// Azure Function: Node.js code to read PostgreSQL data with query parameter and return results as JSON
// Author: Dhyanendra Singh Rathore

// Import the pg (node-postgres) library
const pg = require('pg');

// Entry point of the function
module.exports = async function(context, req) {

    // Define variables to store connection details and credentials
    const config = {
        host: process.env["POSTGRES_SERVER_NAME"],
        user: process.env["POSTGRES_USER"],
        password: process.env["POSTGRES_USER_PASS"],
        database: 'iso3166',
        port: 5432,
        ssl: true
    };

    // req.query.country will be passed as query variable in the URL
    const values = [req.query.country];

    // Create query to execute against the database
    const text = 'SELECT * FROM public.subcountry subcon' + (values[0] != undefined ? ' WHERE subcon."country" IN ($1)' : '');

    const querySpec = {
        text: text,
        values: (values[0] != undefined ? values : '')
    }

    try {
        // Create a pool of connections
        const pool = new pg.Pool(config);

        // Get a new client connection from the pool
        const client = await pool.connect();

        // Execute the query against the client
        const result = await client.query(querySpec);

        // Release the connection
        client.release();

        // Return the query resuls back to the caller as JSON
        context.res = {
            status: 200,
            isRaw: true,
            body: result.rows,
            headers: {
                'Content-Type': 'application/json'
            }
        };
    } catch (err) {
        context.log(err.message);
    }
}
Repeat the testing steps to test our changes. This time we will set a query parameter in the Input tab.

We need to add the query parameter with the value in the function URL to leverage the filtering we just set up. Let’s compare how does our URL looks now with and without the query parameter.

Interrogation (?) marks the beginning of the query parameters in a URL.
Query parameters are separated by an ampersand (&) in a URL.
That’s all, folks. We’ve created and tested a REST-style app for our PostgreSQL database. Before we call it a day, let’s look at how does our folder structure looks now.
func-postgres-rest
 | - getRest1
 | | - index.js
 | | - function.json
 | - node_modules
 | - host.json
 | - package-lock.json
 | - package.json
You can add multiple functions in a functions app for dedicated REST operations, each of which will have their code and binding files or just plain old helper and shared functions.
func-postgres-rest
 | - getRest1
 | | - index.js
 | | - function.json
 | - MySecondFunction
 | | - index.js
 | | - function.json
 | - SharedCode
 | | - myFirstHelperFunction.js
 | | - mySecondHelperFunction.js
 | - node_modules
 | - host.json
 | - package-lock.json
 | - package.json
Here’s the link to the GitHub repo for local development using VS Code. Have Fun!
Conclusion
We learned how to create an Azure Functions app from scratch using the Azure Portal and set up Kudu’s dependencies. We learned the basics of JavaScript apps in Azure and converted our app to a REST-style API. We looked at how to pass query parameters in a URL, and we wrote code to perform actions based on the presence of the parameters. Our REST API works both with and without the parameters.
Next Steps
Environment variables offer a great way to store and reference credentials and secret values. However, you still risk inadvertently exposing these secrets to unauthorized users. A more preferred approach to mitigating this issue is to store the secrets in the Azure Key Vault and reference the values as environment variables in our apps. Read on to find out.

Leave a comment