An innovative Azure Data Factory pipeline to copy multiple files, incrementally, over HTTP from a third-party webserver

Copying files using Azure Data Factory is straightforward; however, it gets tricky if the files are being hosted on a third-party web server, and the only way to copy them is by using their URL.
In this article, we look at an innovative use of Data factory activities to generate the URLs on the fly to fetch the content over HTTP and store it in our storage account for further processing.
Prerequisites
- An active Microsoft Azure subscription
- Azure Data Factory instance
- Azure Data Lake Storage Gen2 storage
If you don’t have prerequisites set up yet, refer to our previous article for instructions on how to create them.
This article will set up our Data factory to fetch publicly available CSV files from the COVID-19 repository at GitHub operated by Johns Hopkins University Center for Systems Science and Engineering (JHU CSSE). We’re interested in the data residing within csse_covid_19_data/csse_covid_19_daily_reports. This folder contains daily case reports with new reports added once daily since January 22, 2020. Files follow a consistent naming convention of MM-DD-YYYY.csv

A typical way of ingesting these files for our project is to download the repository as a zip from GitHub, extracting the files on your client machine, and upload the files to our storage account manually. On the other hand, we will have to upload a new file daily if we want to keep our Power BI report up to date with COVID-19 data. We want to find a solution to automate the ingesting task to keep our data up to date without additional manual efforts. We can achieve this using the Azure Data Factory. Our thought process should be:
- Create a pipeline to fetch files from GitHub and store it in our storage account
- We can fetch only one file at a time using its Raw URL (open a file at the GitHub URL and click on Raw to open the file without GitHub’s UI): https://raw.githubusercontent.com/CSSEGISandData/COVID-19/master/csse_covid_19_data/csse_covid_19_daily_reports/01-22-2020.csv

- Recall that files follow a naming convention (MM-DD-YYYY.csv); we need to create Data factory activities to generate the file names automatically, i.e., next URL to request via pipeline.
- We need to repeat the task multiple times; the first time, we will fetch all the files that already exist in the repository and then once every day.
- Transform the ingested files using Azure Databricks
Activities typically contain the transformation logic or the analysis commands of the Azure Data Factory’s work and defines actions to perform on your data.
A pipeline is a logical grouping of Data Factory activities that together perform a task. Pipelines can be scheduled to execute, or a trigger can be defined that determines when a pipeline execution needs to be kicked off.
Further reading on pipelines and activities
Sign in to the Azure Portal, locate and open your Data factory. We can do that in multiple ways:
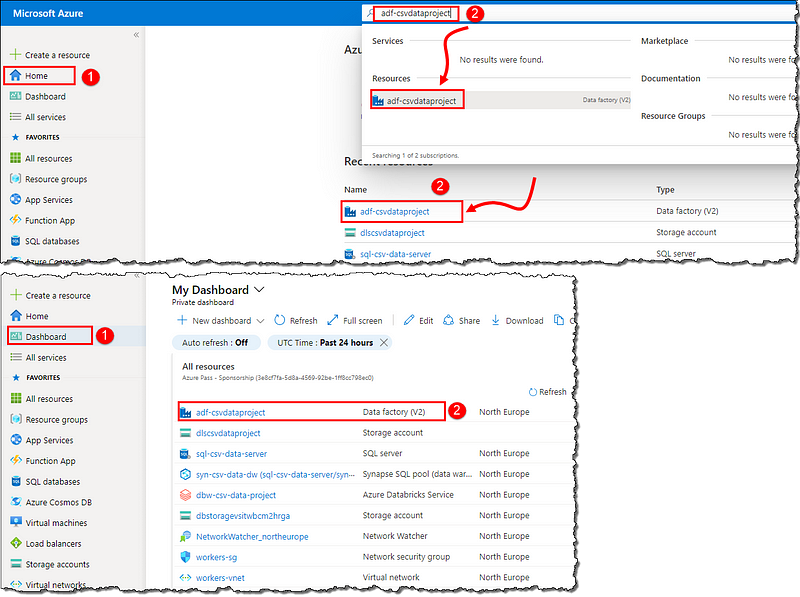
Setting up Data factory components
Select Author & Monitor on the Overview page to load our Data Factory instance in a new browser tab. Switch to the next tab (our Data Factory) and select Manage on the left-corner menu. Let’s start by creating linked services to tell the data factory where do our resources exist.
Linked services
Linked services are like connection strings, which define the connection information needed for the Data Factory to connect to external resources.
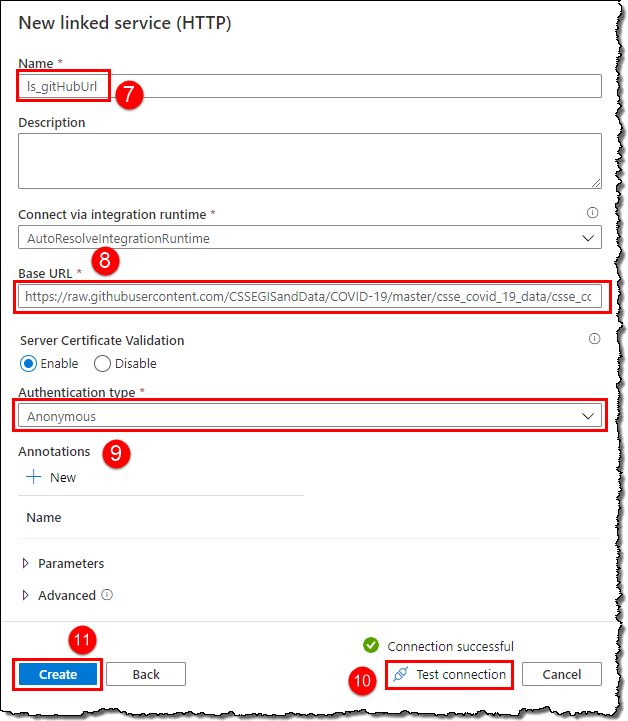
We need to create two linked services, the first to tell the Data Factory about our data source (i.e., GitHub) and how to connect to it. We need to provide the HTTP address (Raw URL of the repository without a file name) as Base URL (https://raw.githubusercontent.com/CSSEGISandData/COVID-19/master/csse_covid_19_data/csse_covid_19_daily_reports/). Follow the below steps:

The second linked service to tell our Data Factory about the data destination (i.e., storage account). Create a new linked service and search for Storage on the New linked service blade, select Azure Data Lake Store Gen2 from the matched resources list, and click Continue. Select the correct storage account from the drop-down (4).

At this point, your screen should look like, as shown below. Click on Publish all to persist your changes, i.e., save. Click Publish on the Publish all blade and wait for the deployment to finish; it might take a few seconds.

Next up, we need to create datasets to tell our Data factory what data to use and its format. We need to create two datasets linked to our two linked services.
Datasets
A dataset is a named view of data that simply points or references the data we want to use in our activities as inputs and outputs. Datasets represent data within different data stores, reachable via a linked service.
Select the Author on the left-corner menu, locate Datasets on the Factory Resources blade and click on the number shown. Select New dataset and follow the steps to create our first dataset to represent our GitHub data.

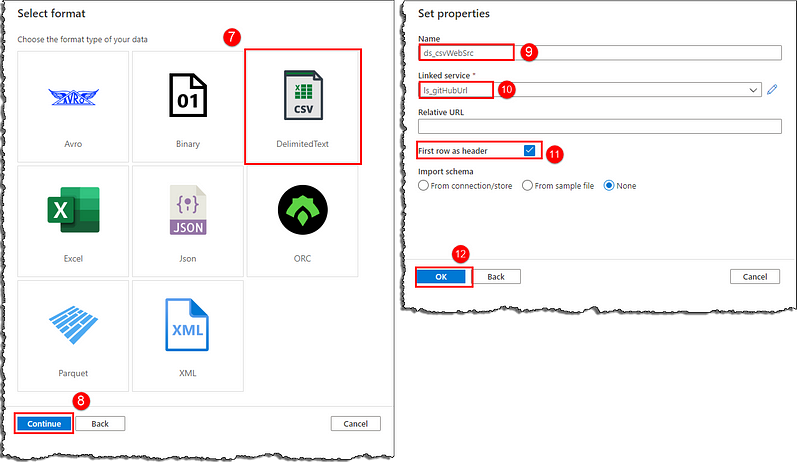
Our new dataset will open up, exposing options to configure further and define our data structure. Notice Base URL under the Connection tab is populated with the raw folder URL we provided in our linked service. Our data lies at the file URL, so we need to provide the absolute URL for the Data Factory to consume the data. We will use the Relative URL field to derive a complete URL to our file (Base URL + Relative URL). However, we want our pipeline to fetch multiple files; hence instead of providing a straight-up file name, we will use a parameter to generate file names dynamically on the fly.
We can use parameters to pass external values into pipelines, datasets, linked services, and data flows. By parameterizing resources, we can reuse them with different values each time.
Parameters are set for the whole duration of the pipeline run. They are like constants in a programming language, defined at the top of the source code.
Switch to the Parameters tab and click + New to create a new parameter. Set the fields as shown; we’re using the first CSV file’s name as the default value. Switch to Connection tab and set Relative URL as @dataset().fileName.
Syntax to refer to the dataset parameters: @dataset().PARAMETER_NAME
We can either type the parameter name with correct syntax or use the Add dynamic content blade to fill it (5–7).
Dynamic content in Azure Data Factory uses expression language.

Create a new dataset representing the data in our storage account. Follow the steps mentioned previously (search for Azure Data Lake Storage Gen2 instead of HTTP on New dataset blade). Your new dataset should look like as below; publish all changes to make them available for use in our Data Factory.

Now that we have fulfilled the requirements to set up our Data Factory, it’s time to create a pipeline that will perform the actual task. Let’s start by creating a new pipeline from the Factory Resources blade (similar to creating a new dataset).
Pipeline
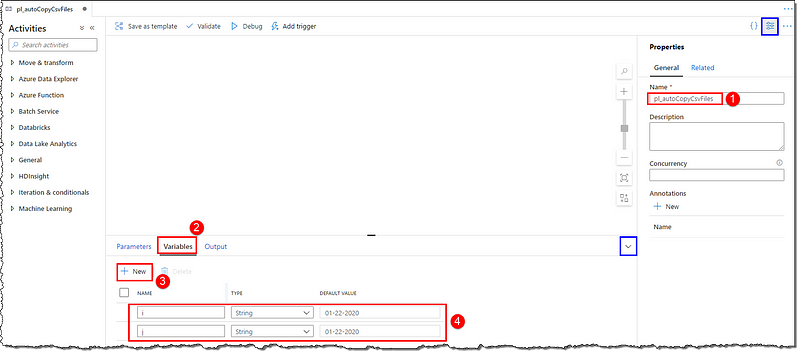
Give a name to your new pipeline and create two variables (i and j) of type string and 01–22–2020 as default value in the Variables tab.
Variables can be set at the start of a pipeline, and read and modified during a run. Variables contain real value at runtime and can be assigned to parameters.
They are like normal variables in a programming language.
Activities
It’s time to add activities to our pipeline; all activities are available on the Activities blade. We will use the following activities:
- Get Metadata: to get the list of all the CSV files that exist in our store. Initially, this will return null as there are no files in our store yet. The output will act as input to the next Set Variable activity.
- Set variable (1): to set our variable i with the latest file’s name in our store. Initially, this will set i with the default value of variable j (i.e., 01–22–2020) as input from Get Metadata activity will be empty. Calculated output (variable i) will act as input to the next Until activity.
- Until: to generate file names from the latest available file date until today, input value i will be used as the start date, and today-1 will be used as the end date. The generated output (variable i) will act as input to the next Copy data sub-activity.
- Copy data: to copy the actual file over HTTP and store it to our storage. Input from the Until activity (variable i) will be passed to our source dataset’s parameter fileName, completing our URL to the raw CSV file. The file will be accessed over HTTP and saved to our storage. The success end will connect to our next Set variable activity.
- Set variable (2 & 3): to increment the variable i for the next iteration. We need two set variable activities as we cannot reference the variable being set in the Value field; hence we will use our variable j as an intermediate variable to increment i.
Get Metadata
Locate Get Metadata under the General category, drag and drop it on the canvas. Give it a name and proceed, as shown below.
Syntax to refer to the output of the Get Metadata activity: @{activity('GET_METADATA_ACTIVITY_NAME').output.FIELD_NAME}

Set variable (1)
Locate Set Variable under the General category, drag and drop it on the canvas. Connect it with the Success (green) end of Get Metadata activity. Give it a name and set variable i as follows
@if(empty(last(activity('ac_checkAllAvailableFiles').output.childItems)),variables('j'),formatDateTime(addDays(formatDateTime(replace(last(activity('ac_checkAllavailableFiles').output.childItems).name,'.csv',''),'MM-dd-yyyy'),1),'MM-dd-yyyy'))You can open the Add dynamic content blade by clicking on the Value field; you can either type or copy-paste the above expression or use the blade’s controls to create the expression.

Until
Locate Until under Iteration & conditionals category, drag and drop it on the canvas, and connect it with the previous set variable activity’s success end. Give it a name; in the Settings tab, enter the following Expression:
@greater(dayOfYear(formatDateTime(variables('i'),'MM-dd-yyyy')),dayOfYear(subtractFromTime(utcnow(),1,'Day')))Move to the Activities tab and click on the edit icon to add the rest of the activities. We will add other activities inside the Until as we need to perform them multiple times. Clicking on the edit icon will show us an empty canvas, signifying we’re now adding activities in the Until activity to iterate over.

Copy data
Locate Copy data under Move & transform category, drag and drop it on the canvas. Give it a name, set the Source and Sink tab configuration, as shown in the image. We will assign the fileName parameter with the variable i. Here’s the fileName expression for convenient copy-paste 🙂
@concat(formatDateTime(variables('i'),'MM-dd-yyyy'),'.csv')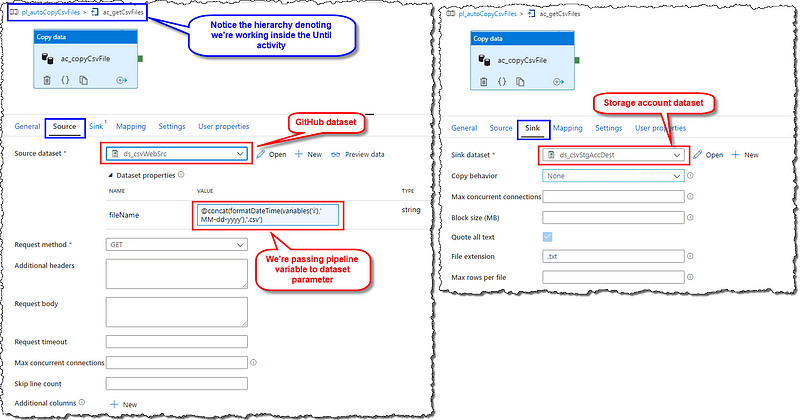
Set variable (2 & 3)
Add another Set variable activity. Connect it with the success end of Copy data activity. Give it a name and set variable j as
@addDays(formatDateTime(variables('i'),'MM-dd-yyyy'),1)Add another Set variable activity and connect it with the success end of the previous Set variable activity. Set i as @variables('j')

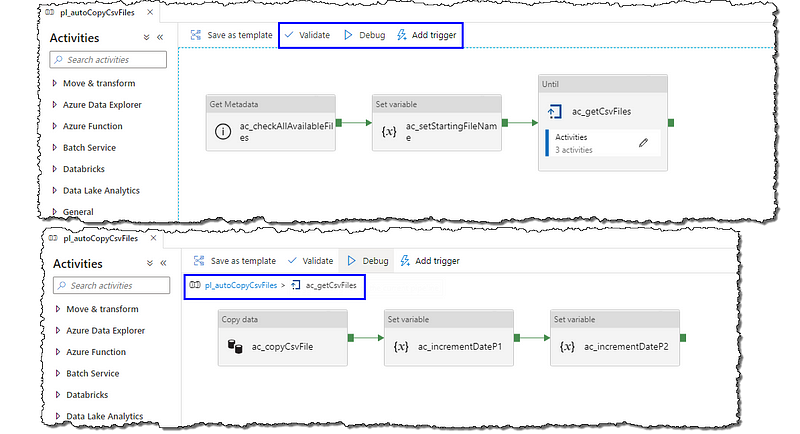
Our pipeline is now ready; it should look something like below. Additionally, you can refer to the JSON of our pipeline from GitHub at the end of the article for any troubleshooting purposes.
The next step after adding all the activities is to validate our pipeline. Locate and select the Validate option to ensure our pipeline is free from errors and is ready to execute. The pipeline validation output blade will show us the results of the validation.
We have two options to run our pipeline and see the fruits of our labor. We can debug run our pipeline without publishing our changes, or we can publish our changes first. It is advisable to Debug run the pipeline first, then publish the changes; debug run shows us logs and other useful tracking info in the pipeline’s Output tab. Dedicate a few minutes to go through the output logs to get a clear picture of the execution and various activities. The sample output is shown below.

You can also use the Add trigger option to run the pipeline right away or set a custom trigger to run the pipeline at specific intervals, time, or based on an external event.
Pipeline JSON
The complete pipeline JSON can be found here.
Conclusion
We presented a compelling problem of copying data over HTTP by using URL. We discussed the various components that make up a pipeline, and we set up an innovative Data Factory pipeline to solve the problem at hand. We also discussed how to set the pipeline’s automatic execution and a brief overview of the pipeline execution logs.
Next Steps
If you’re following our series on turning CSV data into Power BI visuals, head to our next article to continue the journey with cleansing and transforming data in Azure Databricks using PySpark.
If you’re trying to add and execute a Databricks notebook in your Data Factory pipeline, we have the perfect thing to show you the way.

Leave a comment