A quick setup to enforce best practices in Power BI development cycle with Azure DevOps

Power BI best practices offer a quick and reliable method for finding and addressing potential errors and common pitfalls. These practices have helped developers maintain quality, consistency, and performance in their data models and reports. Furthermore, open-source community tools make it possible to evaluate data models and reports against the best practices in seconds.
This article will demonstrate how to enforce Power BI best practices in our development cycle with Azure DevOps. We will use open-source tools and Azure DevOps to build pipelines to evaluate and enforce best practices.
Overview of Best Practices
Over the years, Power BI best practices have evolved and “codified” as JSON rules. Then, the Power BI community created tools to evaluate these best practices to make it easier for developers and reduce development time and effort.
Semantic models and reports have different metadata structures, so we have various tools that work with them. Today, we have a Best Practice Analyzer (BPA) within Tabular Editor 2 (and Tabular Editor 3 — paid) to evaluate semantic model best practices. For reports, we have PBI-Inspector. There might be some other tools with this functionality, but these are the most widely used.
The power of these “codified” rules lies in their customization. New rules can be easily created, and existing rules can be modified to address your specific needs.
A detailed description of creating and editing a best practice rule is beyond the scope of this article. You can find detailed instructions about the semantic model rules here and reports here. Let’s take a quick look at their anatomy within the scope of this article.
Best Practice Rules: Semantic Model
Each semantic model best practice rule follows a standard structure with attributes like ID, Name, Severity, etc. The most crucial attribute for enforcing the best practices for the semantic model is severity.

Severity represents the impact of violating the rule and can have a value between 1 and 3:
- 1 – Information: The rule is not important or cosmetic only.
- 2 – Warning: The rule is of minor importance and may cause end-user confusion or a less-than-optimal user experience.
- 3 – Error: The rule is important and may cause functional issues, performance degradation, or other logical errors.
The severity doesn’t impact when you manually run the BPA. However, violating a severity 3 rule will break the execution if you run the BPA via a command line to automate your deployments. This behavior is helpful for us in enforcing our best practices. We’ll discuss this more later when we build the DevOps pipelines.

Best Practice Rules: Report
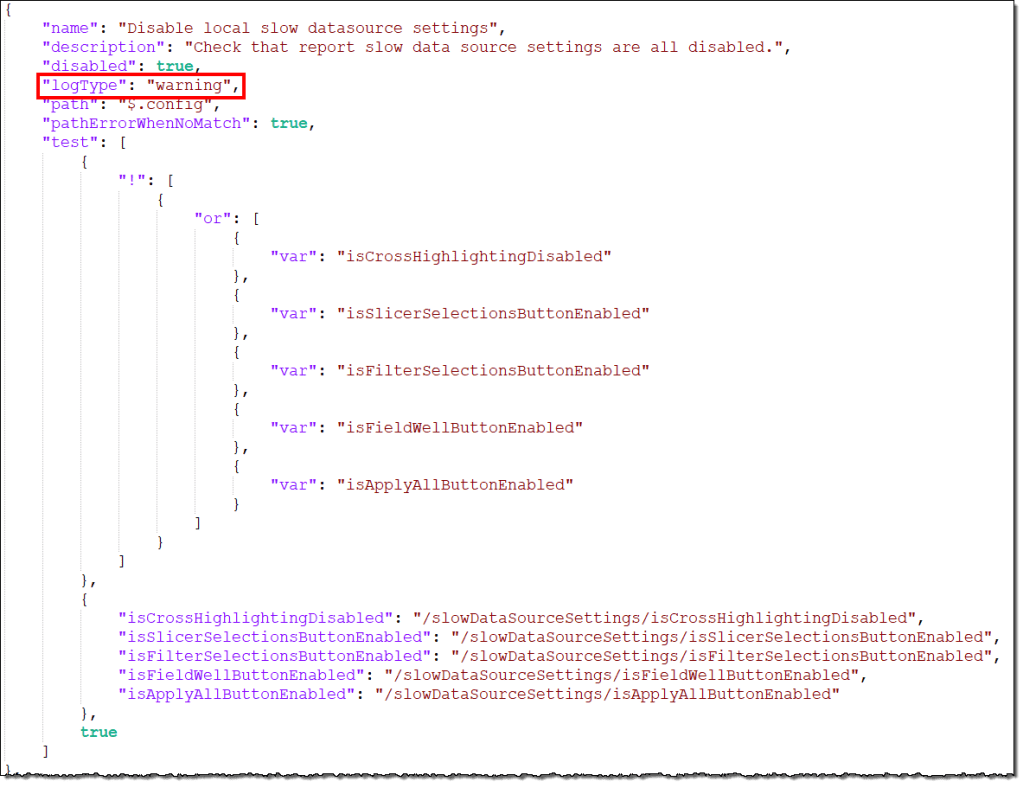
Like the semantic model rules, report rules have a fixed structure and attributes like name, description, etc. “logType” is the equivalent of severity and can enforce the report’s best practices. It can have two different values:
- warning: The rule is of minor importance and may cause end-user confusion or a less-than-optimal user experience.
- error: The rule is important and may cause functional issues, performance degradation, or other errors.
So we have the tools, but there was no enforcement. It was up to the developers’ discretion, knowledge, or deadlines to use these incredible tools and fix the issues. Now, with the possibility of integrating Fabric (and Power BI) workspaces with Git, we can automate the evaluation of data models and reports for best practices and validate the development quality.
Prerequisites
The following prerequisites should be fulfilled to set Git integration with a Fabric workspace:
Power BI/Fabric
- Power BI Pro license
- A workspace on Power BI Premium or a Fabric capacity
- Admin rights to the workspace to connect the DevOps repo
- Following tenant setting switch must be enabled in the Admin portal: Users can synchronize workspace items with their Git repositories
Azure DevOps
- An active Azure account registered to the same user that is using the Fabric workspace
- Access to a repository or rights to create a new repository
Power BI Development Cycle with DevOps
Git integration with workspaces enables multiple development scenarios for Power BI developers.
- A developer uses Power BI Desktop with PBIP format and VS Code to commit the changes to the DevOps repository.
- A developer uses Power BI Desktop, publishes the semantic model, and reports to a workspace, either the same or another dev/individual workspace.
- A developer modifies the semantic model and reports directly in the Fabric workspace, either the same workspace or another dev/individual workspace.
Developers also have the flexibility to carry out the changes using any other third-party tool instead of the Power BI Desktop. All scenarios require a pull request to merge the changes to the main branch. In this article, we will focus on option 2 for setup and demonstration.
We have two Fabric workspaces for demonstration: Pre-DEV Contoso and DEV Contoso. Pre-DEV Contoso is where our developers will publish their changes from Power BI Desktop, and DEV Contoso contains the changes after the best practices have been validated and enforced. The changes can be deployed to TEST Contoso and further in the development cycle from DEV Contoso.
In addition, we’re using a sample Contoso Power BI PBIX file from SQLBI to violate some best practices and showcase how our DevOps pipeline handles it. The PBIX is published in the DEV Contoso. We will change the PBIX and publish it to the Pre-DEV Contoso. Then, we will use DevOps to validate and enforce the best practices and move the changes to the DEV Contoso.

Enforcing Best Practices with Azure DevOps
Let’s get started with four simple steps. Steps 1 to 3 are a one-time job per Power BI project to connect the workspace(s) to the Azure DevOps repository and build a pipeline with branch policies to enforce best practices. Step 4 is required after every change carried out in the PBIX files.
Step 1 – Connect Fabric workspace to Azure DevOps
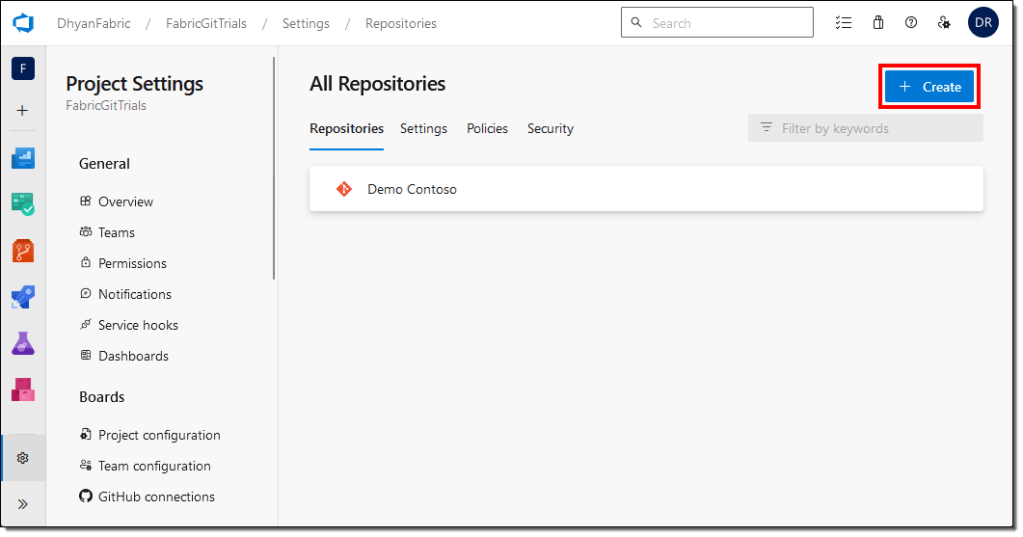
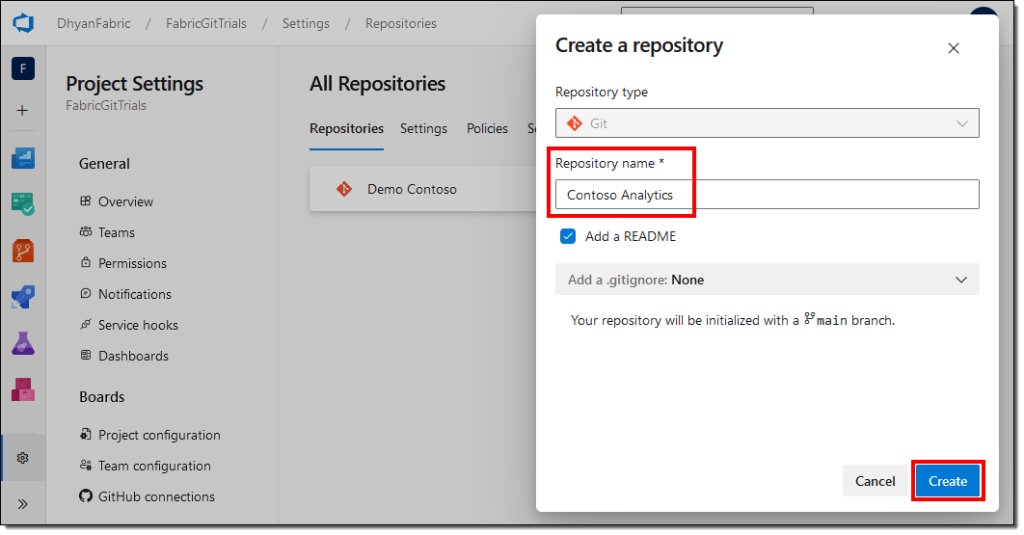
Create a Git repo
If you don’t already have one, create a new Azure DevOps repo. If you don’t have a repo or don’t have the right to create one, talk to your DevOps or Operations team to get one created for you.
Connect a workspace to a Git repository
Open the Power BI service and navigate to the workspace that you want to connect with Git. You need the workspace admin role to create a connection, but once connected, all members and contributors can work with Git if they have the relevant permissions in the Git repo.
- Go to Workspace settings
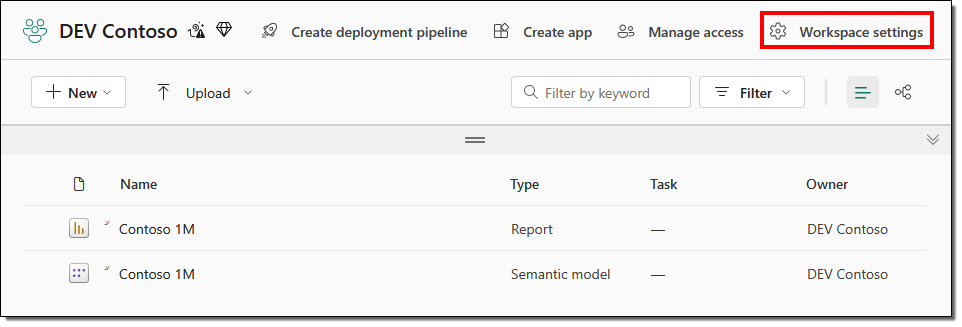
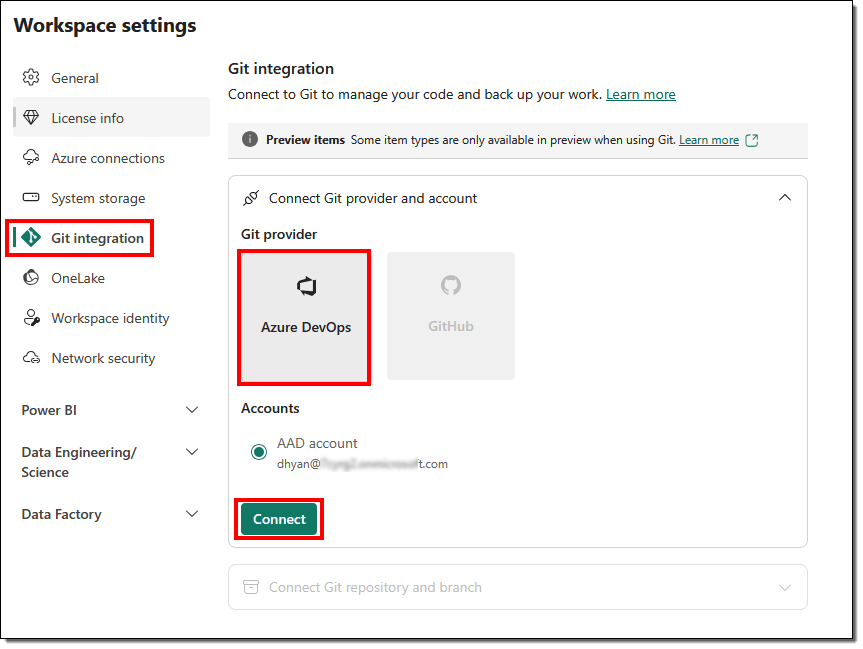
- Select the Git integration tab, select Azure DevOps under Git provider, and select Connect to sign into Azure DevOps using your signed-in Fabric account automatically. Remember, you should use the same account in the Fabric and DevOps if you’ve multiple accounts or tenants.
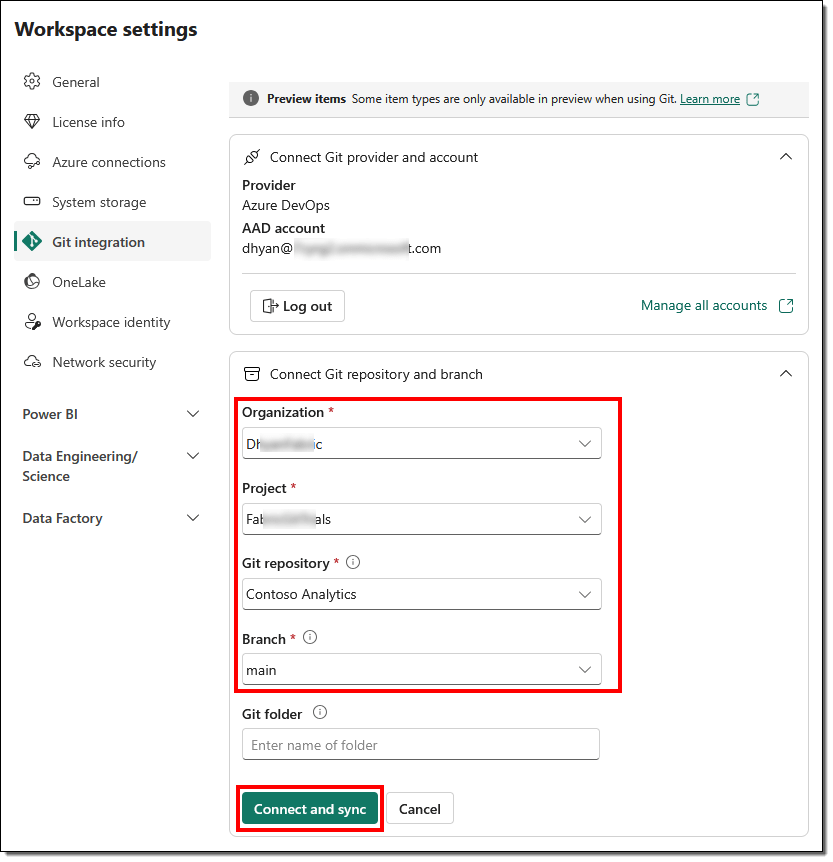
- From the dropdowns, select the details about your Organization, Project, Git repository, and Branch. We will leave the Git folder blank. Select Connect and sync.
During the initial sync, the content will be copied from a nonempty location to an empty one. In our case, the content will be copied from the workspace to Git. If both the workspace and Git have content, we must specify which direction the sync should take.
Git doesn’t copy or contain the data from a semantic model. Only metadata is synced and available in Git. Neither does it store your data source credentials.
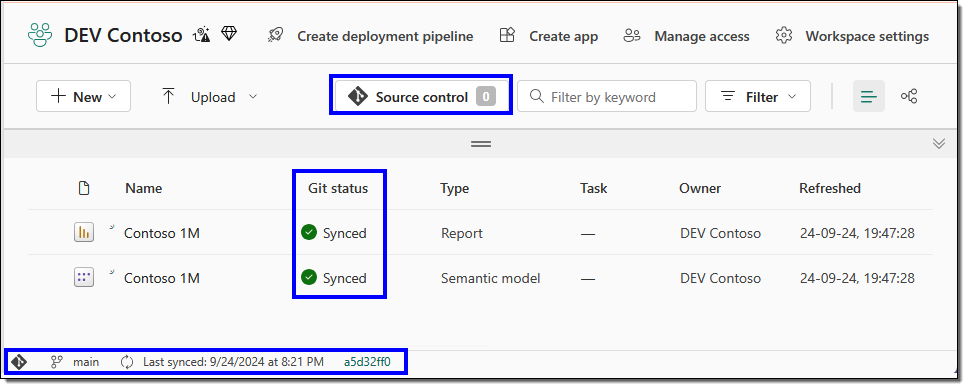
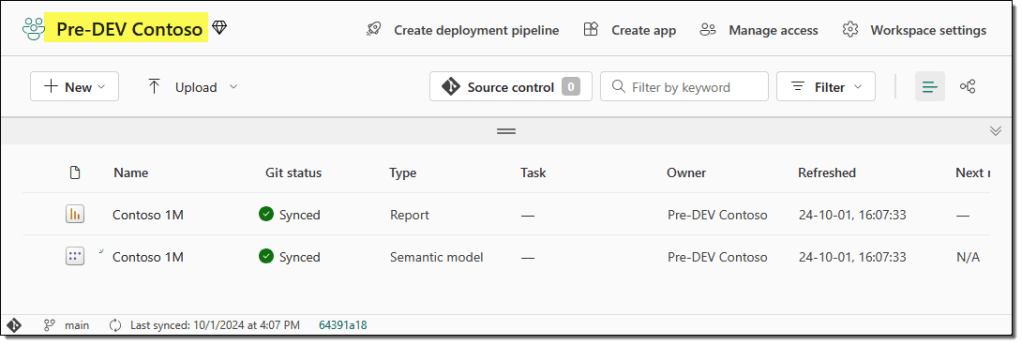
After a successful sync, the workspace displays source control information about the connected branch, the overall status of each item, and the time of the last sync.
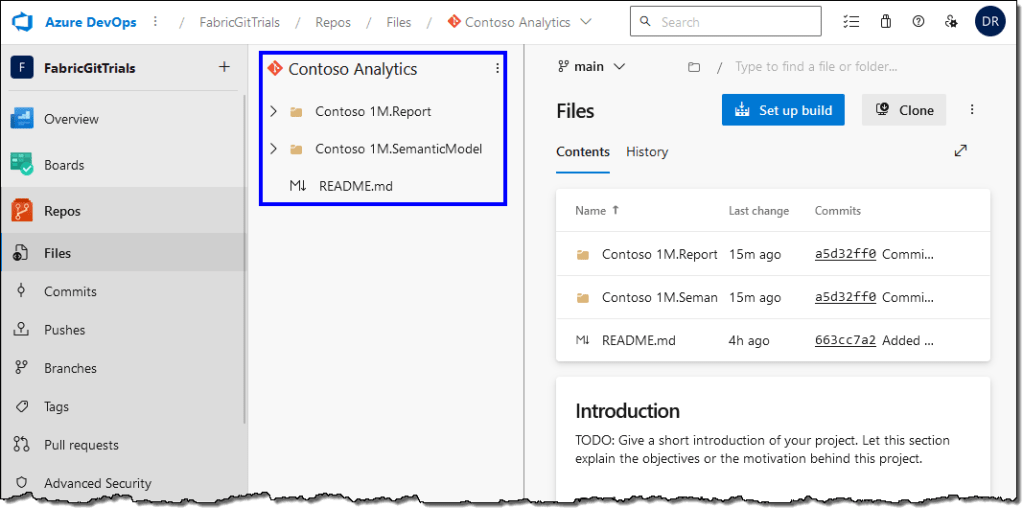
On the Azure DevOps side, the repository branch will contain a folder for each item in your workspace.
For this article, we use two workspaces (Pre-DEV Contoso and DEV Contoso) to demonstrate how the Git pipelines enforce best practices. In step 1, we connected the DEV Contoso workspace with the DevOps. We will also connect our Pre-DEV Contoso workspace with the same DevOps repo and branch. This time, the content will be copied from Git to the workspace.
Step 2 – Create an Azure DevOps pipeline
Next, we will create a new pipeline in Azure DevOps to evaluate the best practices for our reports and semantic models.
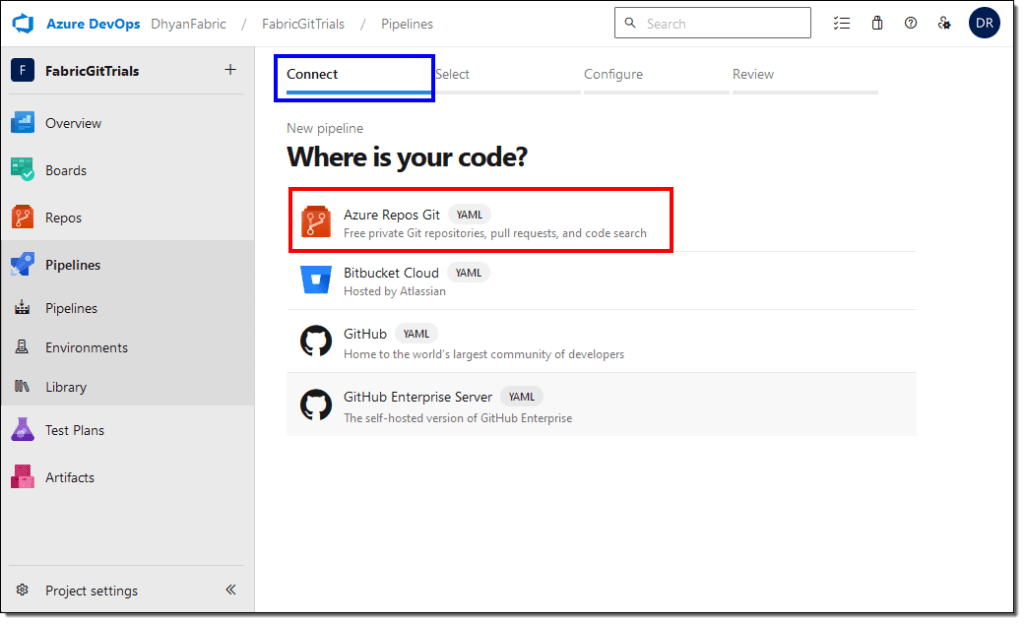
- Find the Pipelines tab in the left navigation menu and select Create Pipeline.

- On the Connect tab, select Azure Repos Git.
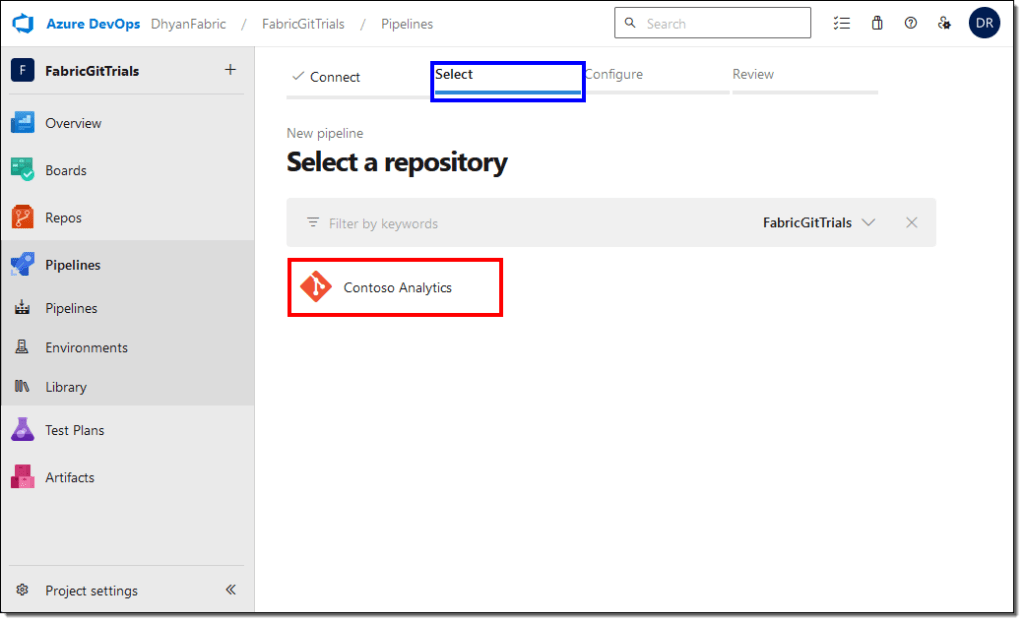
- On the Select tab, select the Git repo connected to your Fabric workspace.
- On the Configure tab, select Starter pipeline.
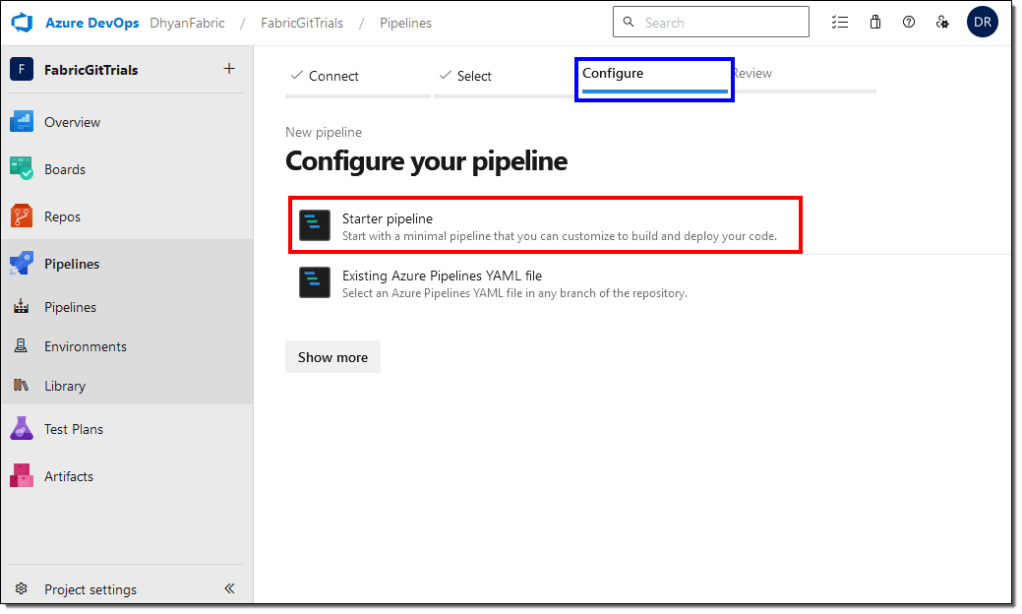
DevOps will create a sample YAML code for our pipeline. We will replace this code with a new one to evaluate our semantic models and reports for violations of best practices. Select and delete this YAML code.
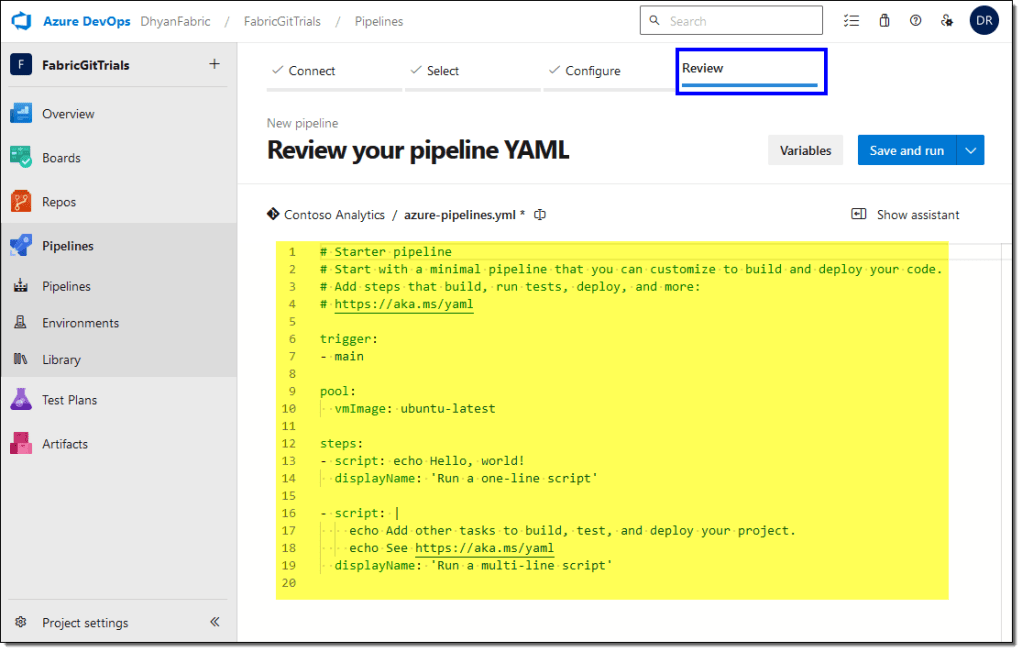
Microsoft has provided a sample YAML pipeline code (also known as Power BI developer mode pipeline) that we can use to evaluate the best practices in our pipeline.
- Open the Power BI developer mode pipeline GitHub repo in a new tab and copy the YAML code.
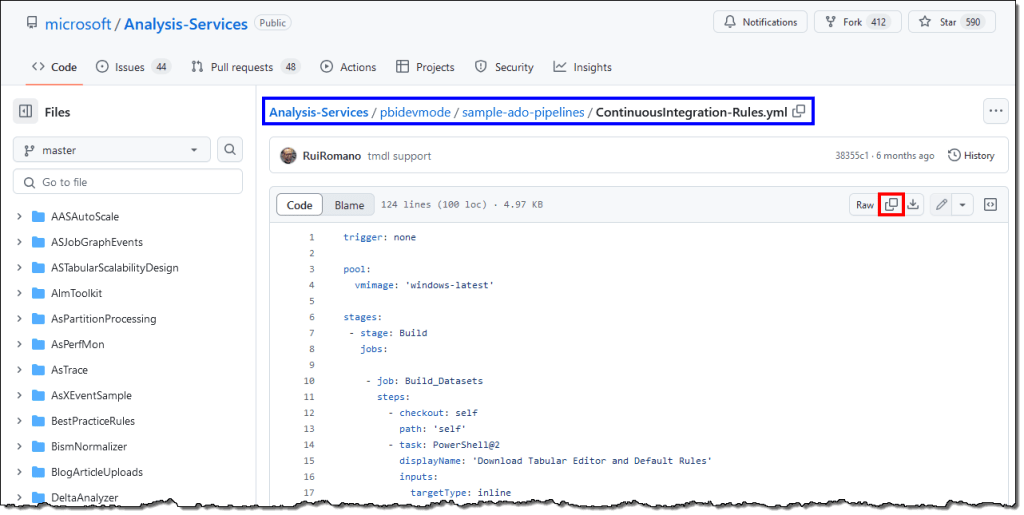
This pipeline contains two build jobs, and each job contains two PowerShell tasks:
Build_Datasets: Evaluate the semantic models in the Azure DevOps repo for best practice violations.
- Task 1: Download the Tabular Editor 2 binaries from the GitHub and Semantic Model best practice rules from Microsoft’s Analysis Services GitHub repo.
- Task 2: Evaluate all the semantic models in the Azure DevOps repo against the downloaded best practice rules using the best practice analyzer in Tabular Editor 2.
Build_Reports: Evaluate the reports in the Azure DevOps repo for best practice violations.
- Task 1: Download the PBI-Inspector binaries and default best practice rules from the PBI-Inspector’s GitHub repo.
- Task 2: Using the PBI-Inspector, evaluate all the reports in the Azure DevOps repo against the downloaded best practice rules.
You can use the best practice rules of your choice by changing the download URL for the rules. For example, you can use the semantic model best practice rules provided by the Tabular Editor team instead of the Microsoft-provided rules.
Alternatively, you can upload customized JSON rule files to the repository’s root and adjust the file name and path in the YAML accordingly.
Tip: You can add more build jobs and tasks to add additional custom validations.
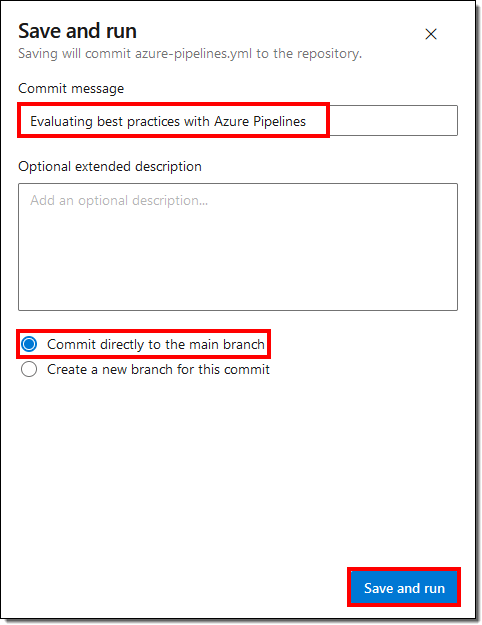
- Paste the copied YAML code into your new pipeline, select Save and run.
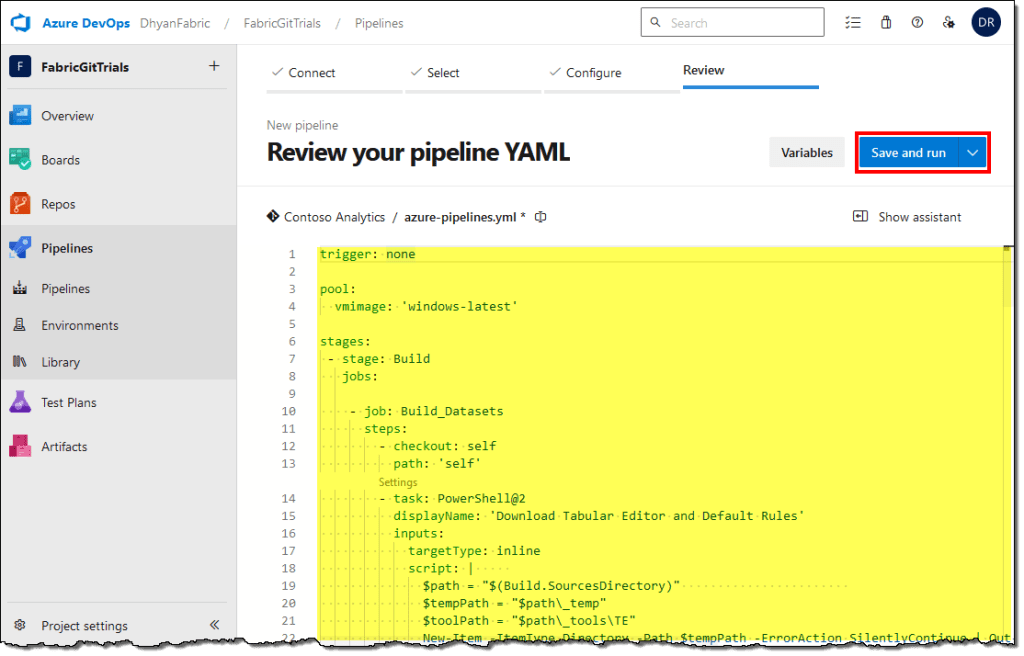
- Add a commit message and commit the new pipeline to the repository.
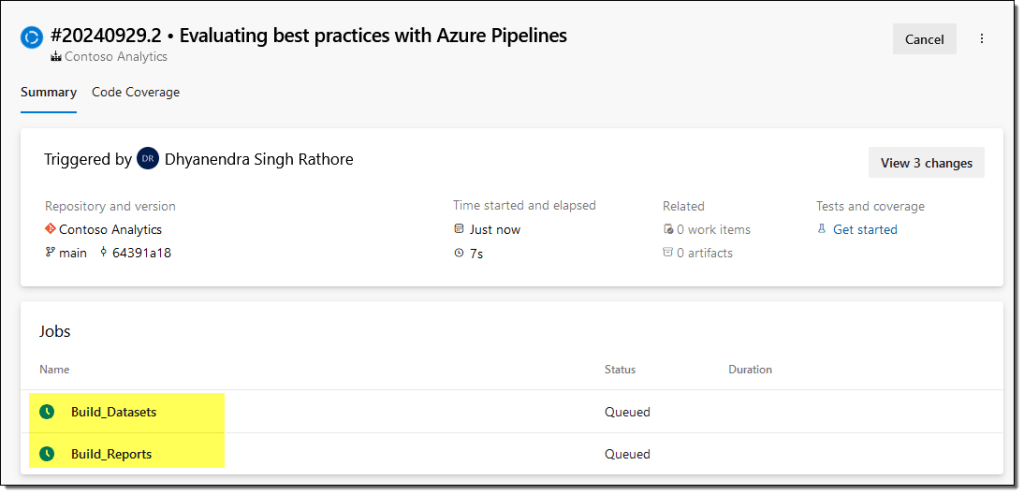
- DevOps runs the pipeline and starts the build jobs in parallel. Wait for the pipeline to finish executing.
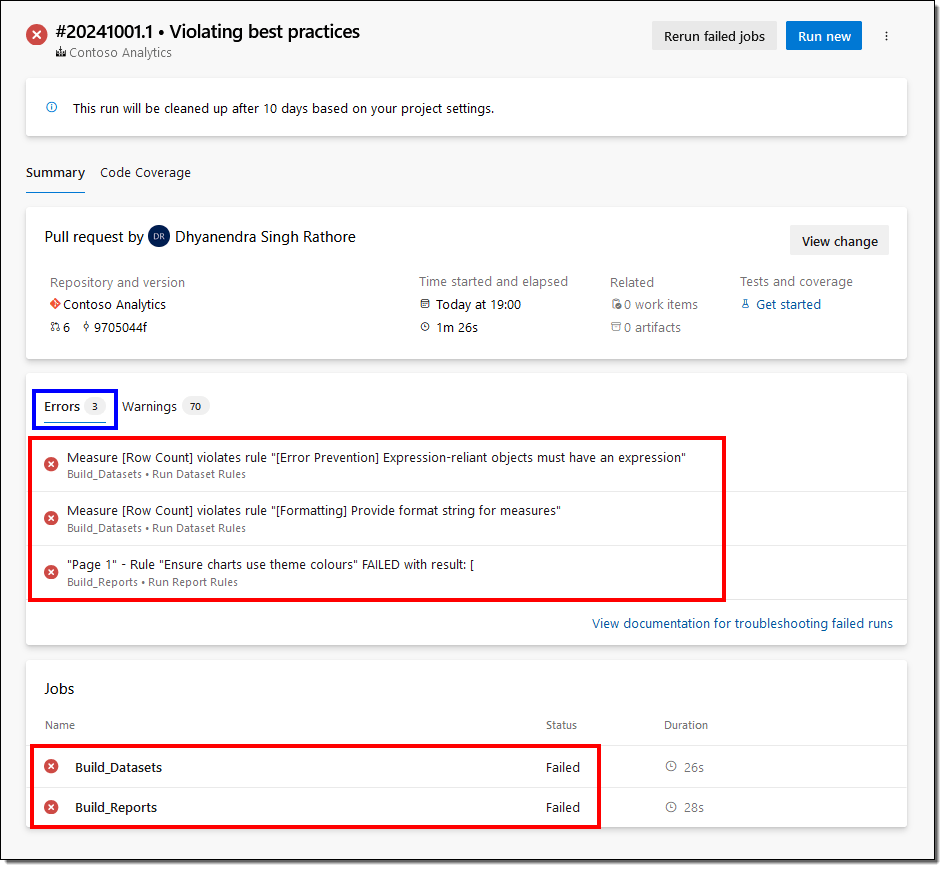
- After the pipeline runs, DevOps reports all the warnings and errors it encounters. In our case, there are only warnings.
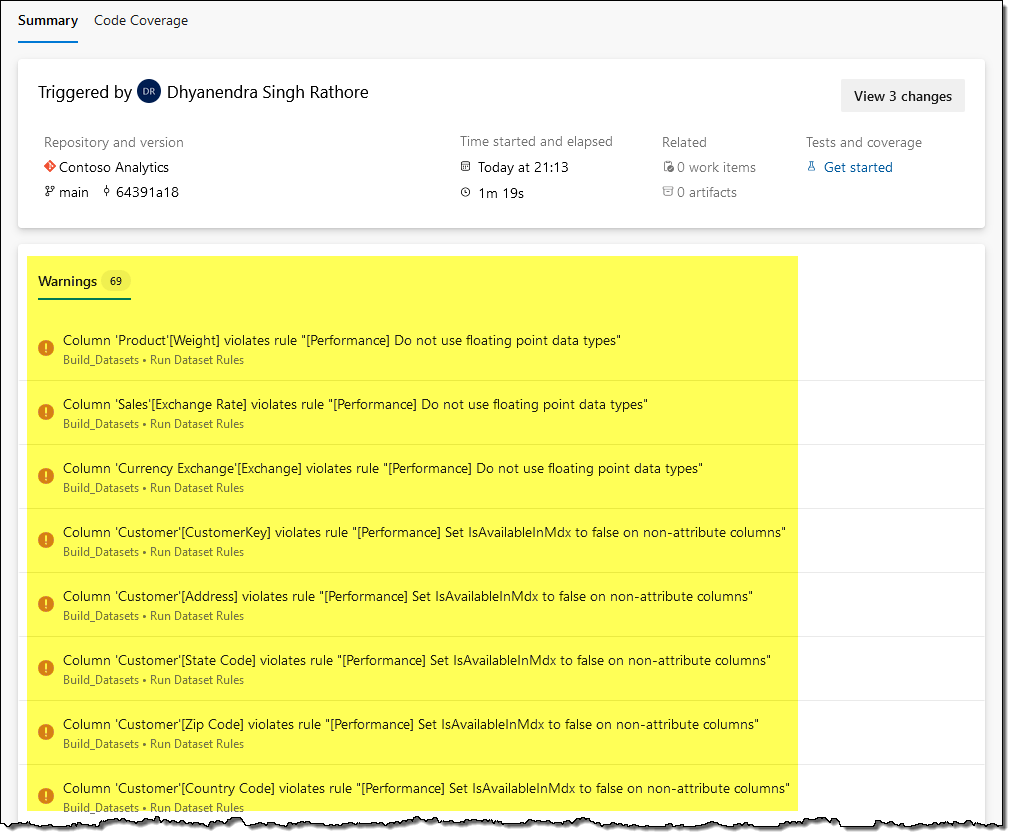
- Click on any warning link to open a detailed view of the jobs.
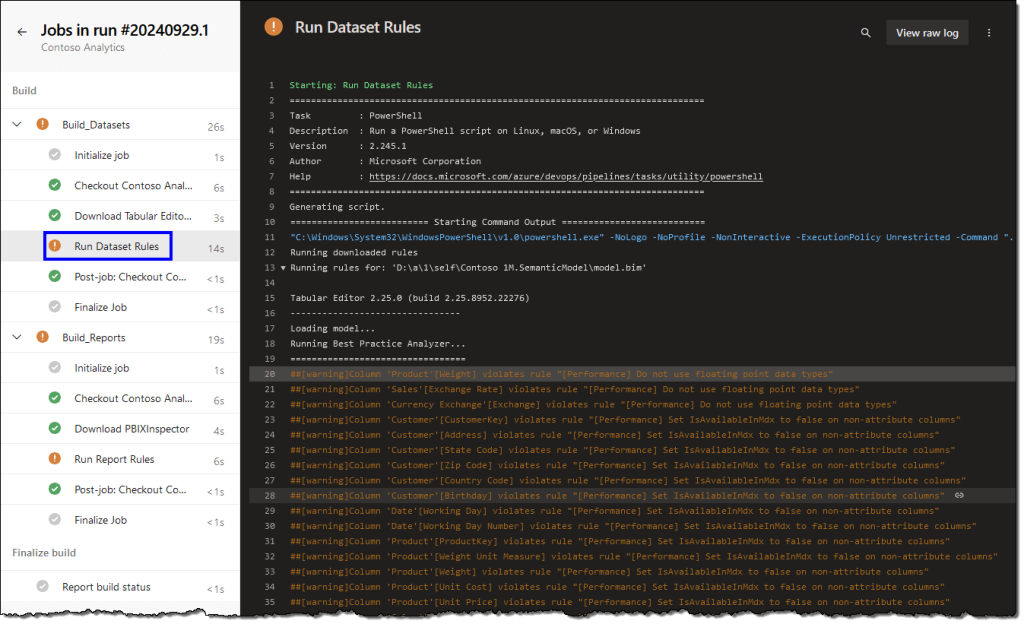
If your report or semantic model fails a rule with an error severity level, the build will fail, and the error(s) will be highlighted.
Our pipeline to evaluate the best practices is all set.
Step 3 – Define branch policies
Next, we need to enable branch policies on the main branch to ensure that no commits can be made directly to it. The main branch will only contain best practices-validated reports and semantic models. To merge the changes back into the main branch, developers will need to create a pull request, and we can configure the pipeline to run with every pull request.
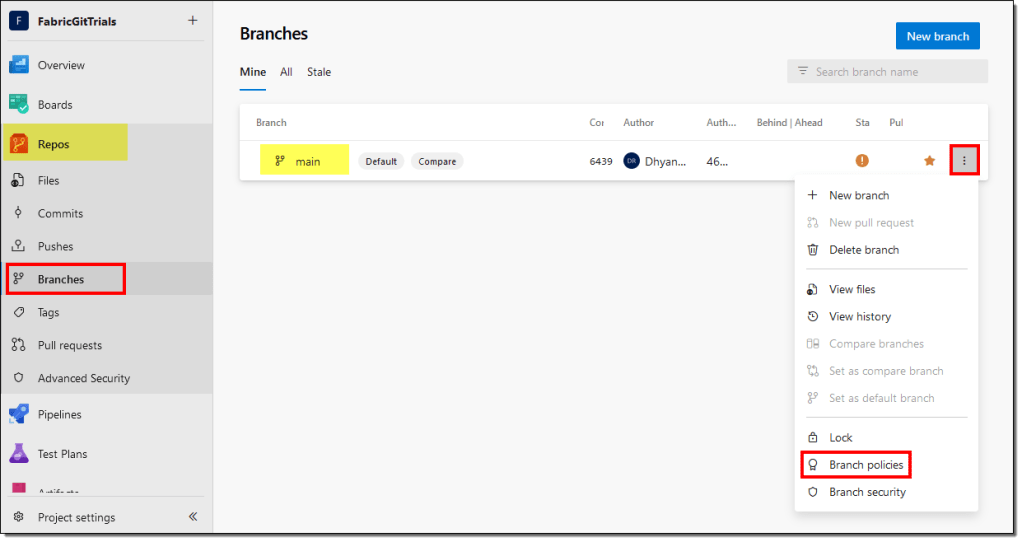
- In Azure DevOps, on the left side panel, select Repos > Branches. Then, for the main branch, select More options > Branch policies.
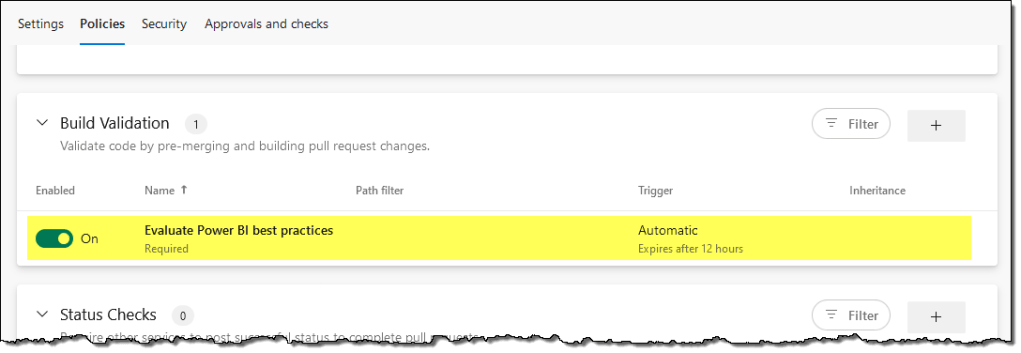
- On the Policies tab, you can choose to always have a reviewer for your pull requests. We will only set up a Build Validation for this article by adding a new build policy.

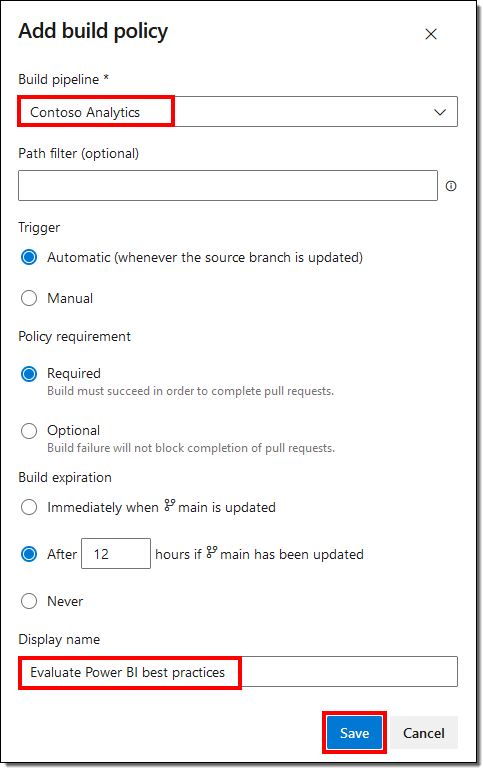
- Select the Build pipeline we created in the previous step, provide a Display name, and hit Save.
From a setup perspective, that’s all we have to do to enforce best practices. Let’s look at how it works with the development process.
Step 4 – Create a pull request
For the demonstration, we made two changes in the sample PBIX file that violet the best practice rules with the highest severity, i.e., error. We added a new measure without a definition and used a color outside the applied theme. Then, we published the PBIX in the Pre-DEV Contoso workspace.
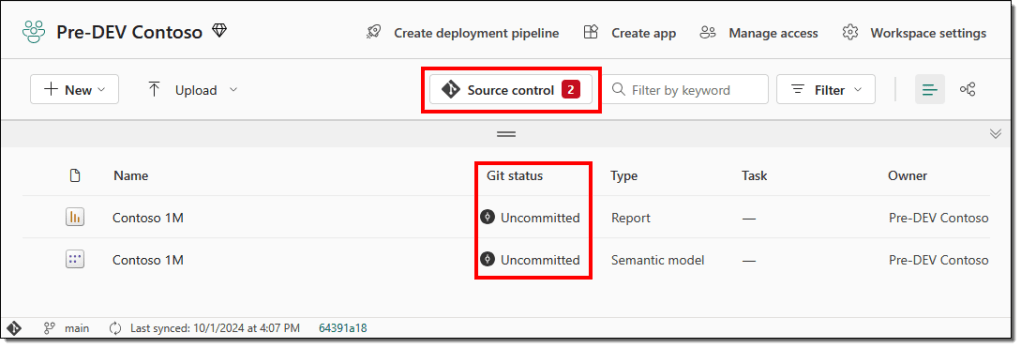
- The Pre-DEV Contoso workspace in the Power BI service shows we have uncommitted changes.
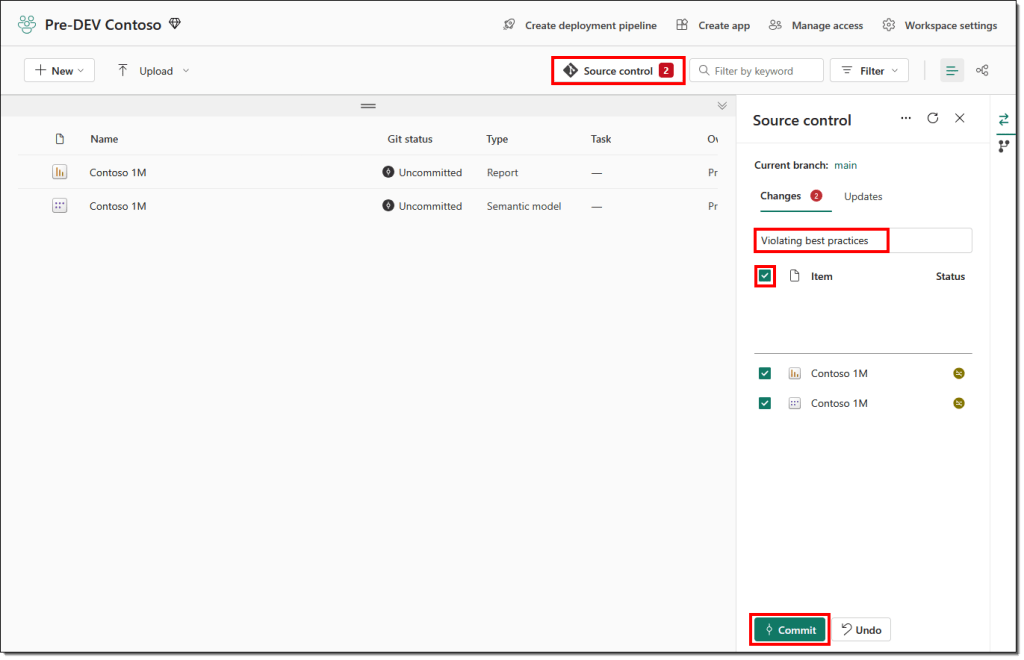
Committing these changes to Git is straightforward and should take only a few seconds.
- An attempt to commit these changes to Git fails with the following error message:
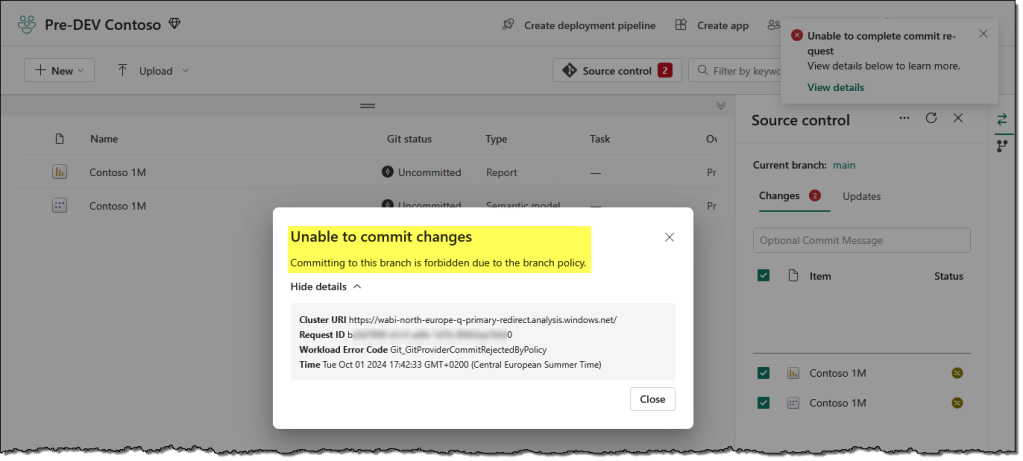
Our policies on the main branch prevent direct commits, and changes are only allowed through a pull request. To create a pull request, we need to check out a new branch to make the changes.
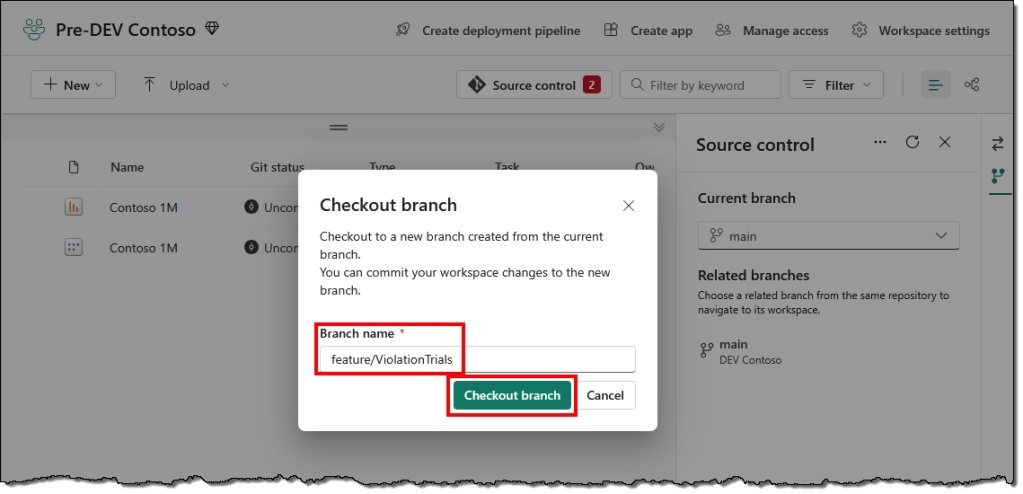
- To create a branch, in the Source control pane, switch to the Branches tab and from the dropdown select Checkout new branch.
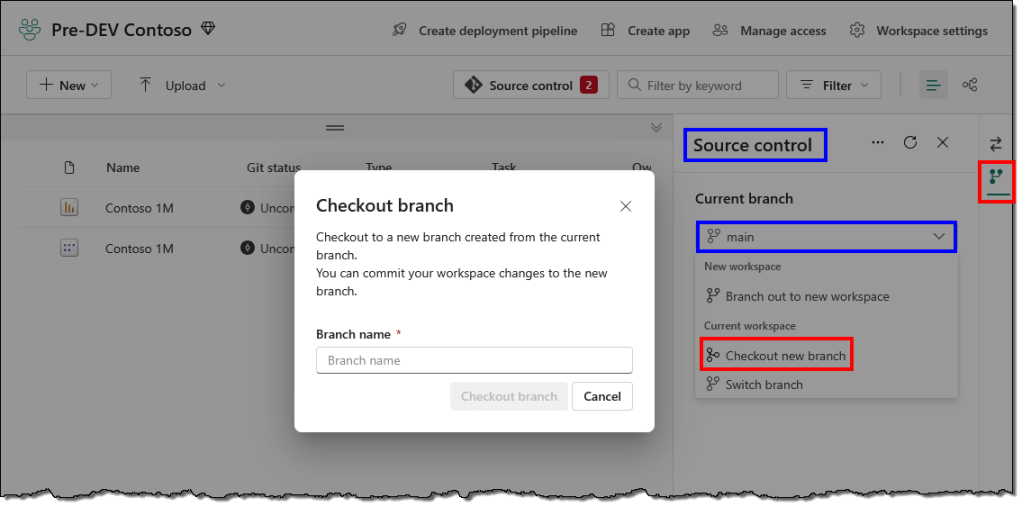
- Provide a name for the new branch and select the Checkout branch. A good practice is using a folder structure to identify the branch type.
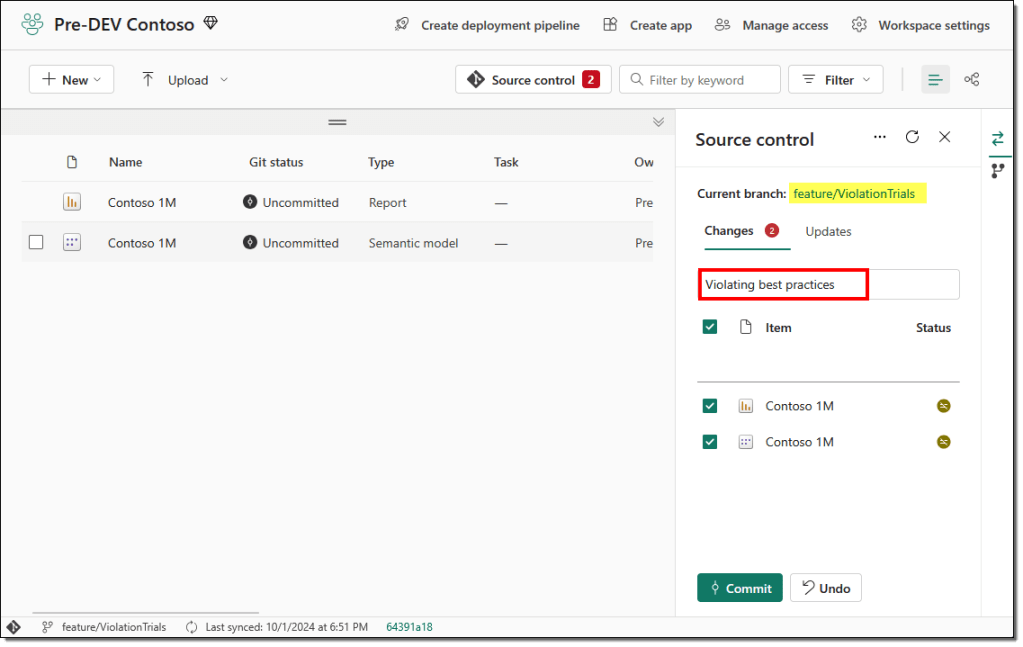
- Commit the changes to this new branch and wait for the commit to be finished.
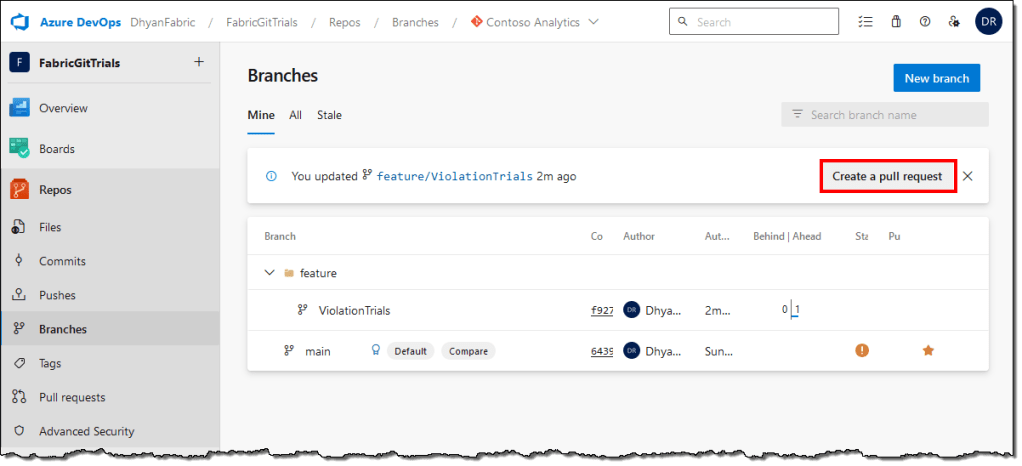
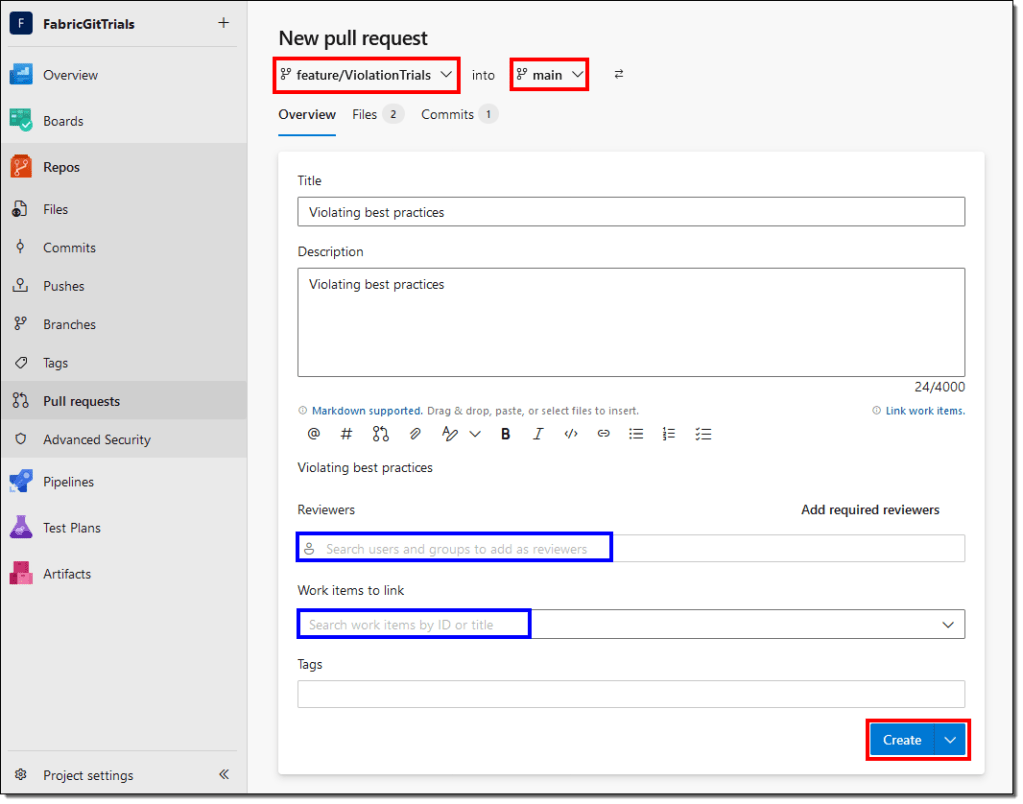
- Head to the Azure DevOps and create a pull request into the main branch.
- Optionally, you can add Reviewers and Azure DevOps work items to your pull request.
- The pull request workflow will allow you to validate and review the conflicts and automatically trigger the pipeline. Wait for the required checks to finish running.
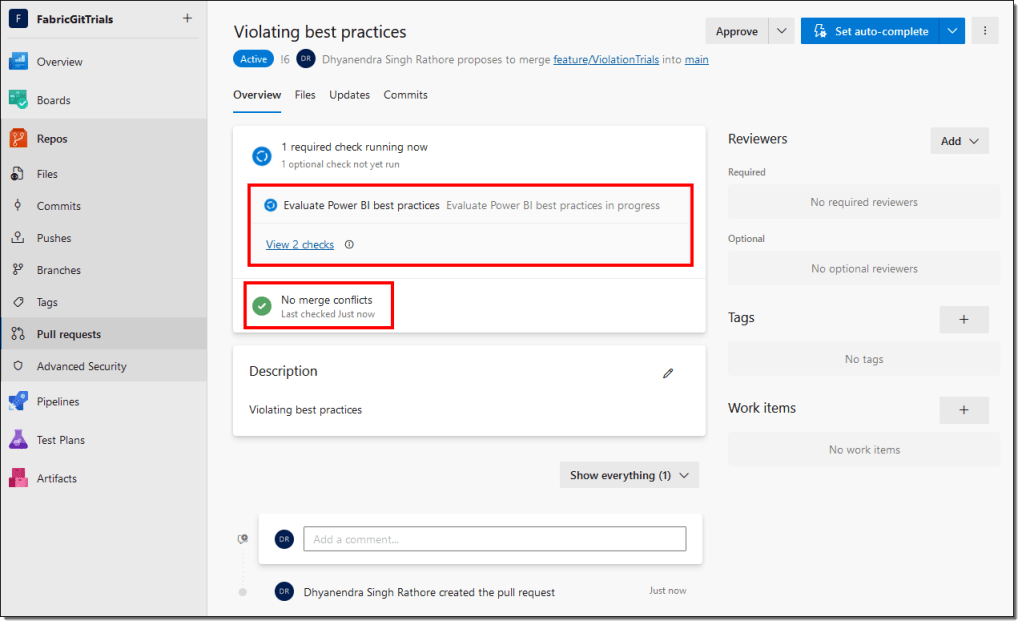
- If any of the rules contains a high-severity error, the required checks will fail, and you can’t finalize the pull request to merge the changes back into the main branch.
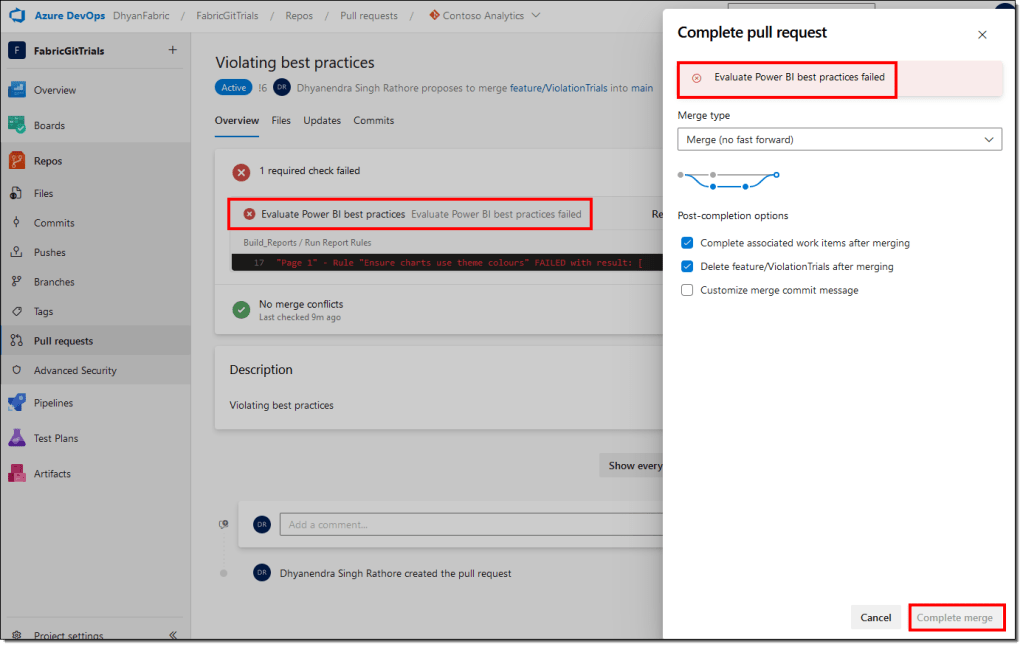
- Click on the failed message to open the pipeline execution details and check which high-severity rule(s) have failed.
You won’t be able to merge the changes unless these errors have been fixed, i.e., best practices must be followed. If you’re the developer, resolve these issues or contact your developers to rectify these errors. The changes must be published to the workspace and committed to the branch you used recently.
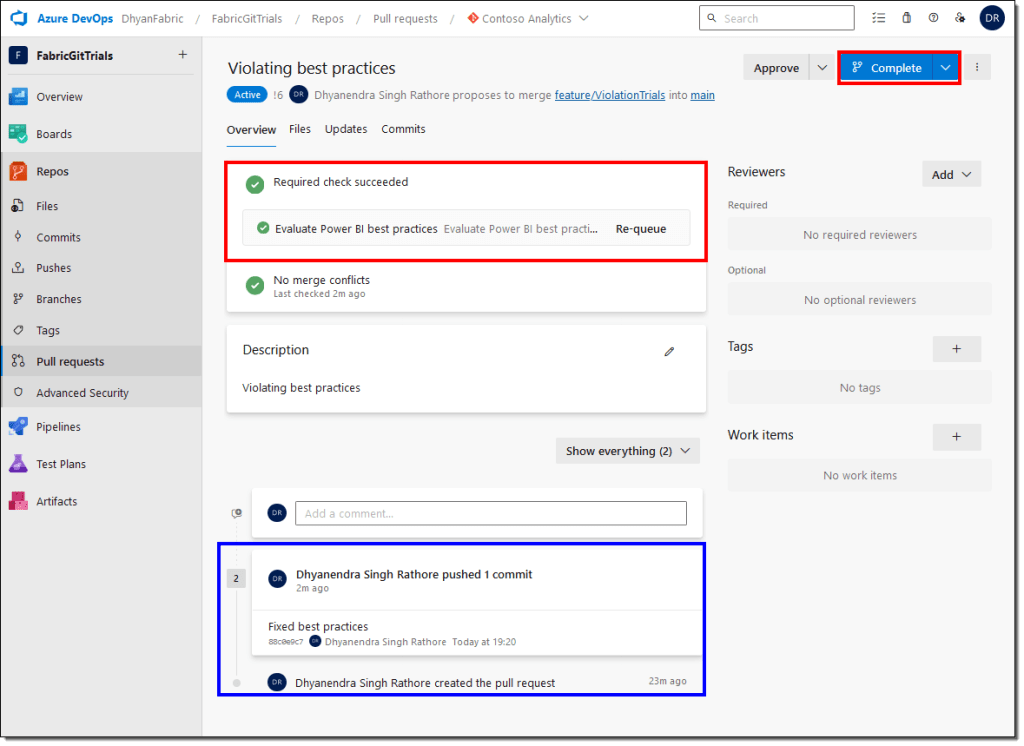
- DevOps will automatically run the required checks on the previous pull request again. You don’t have to create a new pull request. If the checks are successful, then you’ll be able to complete the pull request.
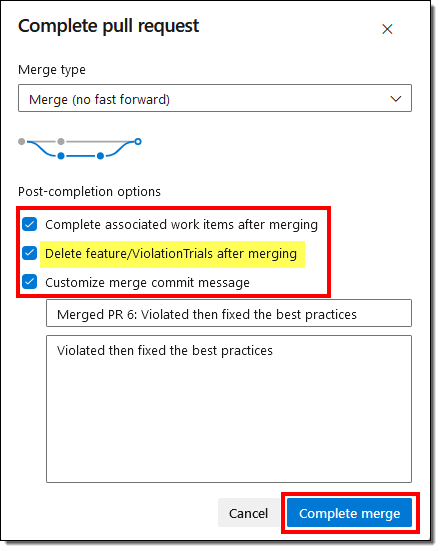
- Observe the options available while completing the pull request. If you don’t want to keep the older branches, you can opt to delete the feature branch.
- Wait for the merge to finish. Your main branch now contains the new changes.

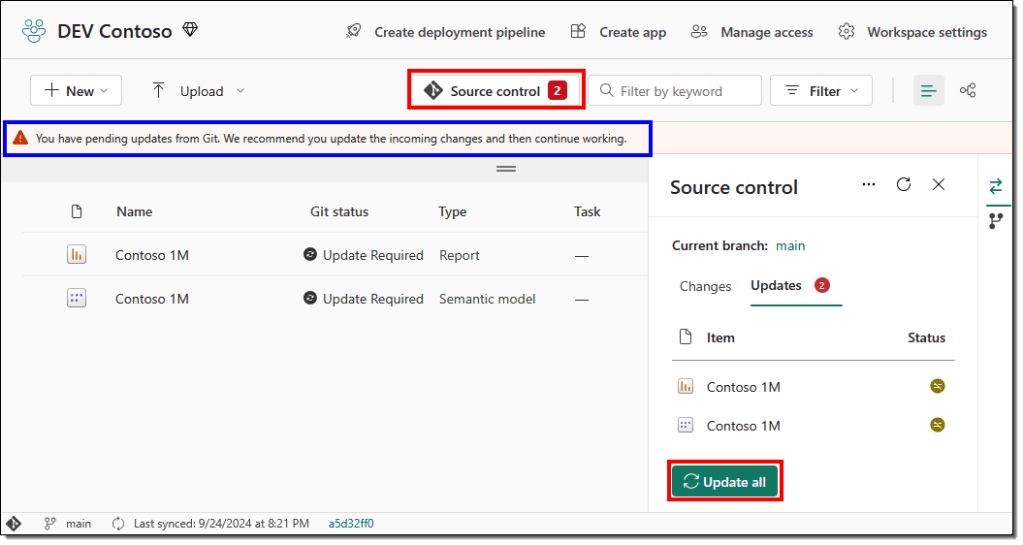
- Next, we need to update our primary development workspace, the DEV Contoso workspace, to reflect the new changes from Git. In the workspace, we get an alert informing us that our workspace is behind the connected branch, the main branch. Use the Source control to update the workspace and wait for the update to finish.
This has successfully enforced best practices in our development process. You can deploy/move these changes to your TEST or UAT workspace.
It’s crucial to note that Git doesn’t store and copy over your data and data source credentials. After syncing the changes from Git, you’ll have to refresh the semantic model manually. If a new data source was added to the semantic model, you might have to set the data source credentials from the semantic model settings.
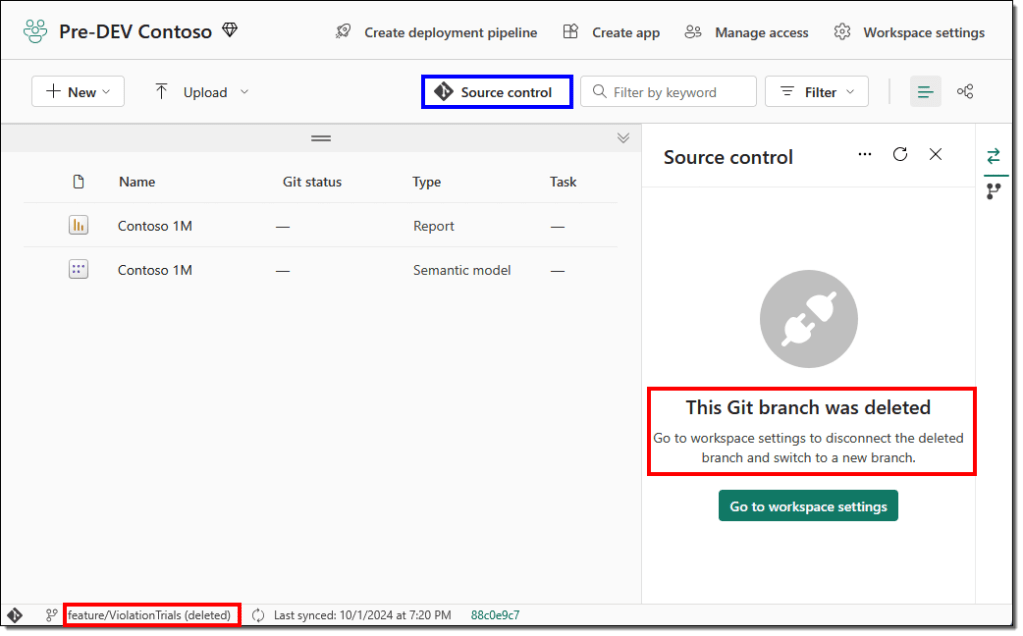
If you choose to delete the feature branch while completing the pull request, you may receive an error message in your workspace or be politely asked to change the Git branch connected to your workspace.
Once you’ve set up the validation pipeline and branch policies, your team can choose any development method. This setup is not dependent on the development tool or process. The power lies with the pull requests, which utilize the build pipelines to enforce best practices.
That’s all for now! Let us know how you use the build pipelines for your Power BI challenges.
Conclusion
In this article, we discussed the Power BI semantic model, report best practices, and the recent advancements that have enabled us to set up automatic best practice evaluations. We also set up an Azure DevOps pipeline that enforces the best practices by using pull requests to merge the changes to the main branch. This method is independent of the tools and development process and can be easily adopted by teams with diverse skill sets and preferences.

Leave a comment