Using PySpark to incrementally processing and loading schema drifted files to Azure Synapse Analytics data warehouse in Azure Databricks

Data is the blood of a business. Data comes in varying shapes and sizes, making it a constant challenging task to find the means of processing and consumption, without which it holds no value whatsoever.
This article looks at how to leverage Apache Spark’s parallel analytics capabilities to iteratively cleanse and transform schema drifted CSV files into queryable relational data to store in a data warehouse. We will work in a Spark environment and write code in PySpark to achieve our transformation goal.
Prerequisites
- An active Microsoft Azure subscription
- Azure Data Lake Storage Gen2 account with CSV files
- Azure Databricks Workspace (Premium Pricing Tier)
- Azure Synapse Analytics data warehouse
If you don’t have prerequisites set up yet, refer to our previous articles to get started:
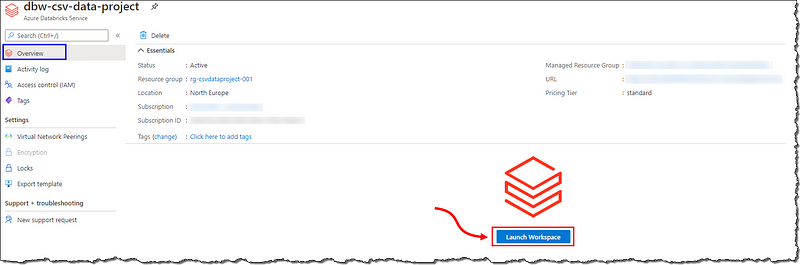
Sign in to the Azure Portal, locate and open your Azure Databricks instance and click on ‘Launch Workspace.’ Our Databricks instance will open up in a new browser tab; wait for Azure AD SSO to sign you in automatically.
Next, we need to create a cluster of nodes to leverage Apache Spark’s unparalleled parallel processing (pun intended) capabilities to process, cleanse, and transform our semi-structured data.
Spin up an Apache Spark Cluster
Select Clusters on the left menu to begin creating a new cluster. Start by selecting + Create Cluster and proceed as shown. Two essential things to pay attention to here are the Databricks runtime version and the minimum and the maximum number of worker nodes. Our cluster will scale automatically between these nodes to accommodate the load. Wait for the creation process to finish.

Click on Start to start your cluster. It might take a few minutes for Azure to provision and set up your cluster resources. Keep an eye on the cluster status indicator to see the real-time status.

The real magic of Databricks takes place in notebooks. Azure Databricks supports notebooks written in Python, Scala, SQL, and R. In our project, we will use Python and PySpark to code all the transformation and cleansing activities. Let’s get spinning by creating a Python notebook.
A notebook is a web-based interface to a document that contains runnable code, narrative text, and visualizations.
PySpark is a Python API for Apache Spark. Apache Spark is written in Scala. PySpark has been released to support the collaboration of Apache Spark and Python.
Select the Workspace in the left menu and follow the steps as shown. Your notebook will open up after creation; take a minute to look around to familiarize yourself with the UI and various options available for us.

The first few lines in a notebook should tell Databricks where our data is and how to access it. We will mount our storage account to the Databricks filesystem and access it as local storage.
Mount storage account to Databricks filesystem
Head over to our article for detailed steps on mounting and accessing ADLS Gen2 storage in Azure Databricks. We will keep it short.
Connecting and accessing Azure Synapse Analytics data warehouse from Databricks
Our end goal is to load the data into a data warehouse to derive insights from the data and build reports to make decisions. Let’s set up the connectivity before proceeding.
Our connections are all set; let’s get on with cleansing the CSV files we just mounted. We will briefly explain the purpose of statements and, in the end, present the entire code.
Transformation and Cleansing using PySpark
First off, let’s read a file into PySpark and determine the schema. We will set some options to tell PySpark about the type and structure of the columns.
# Read the csv files with first line as header, comma (,) as separator, and detect schema from the file
csvDf = spark.read.format("csv") \
.option("inferSchema", "true") \
.option("header", "true") \
.option("sep", ",") \
.load("dbfs:/mnt/csvFiles/01-22-2020.csv")
csvDf.printSchema()

This file has lesser columns than we expected from our GitHub Source and column names differ as well. We’re interested in highlighted columns for our final Power BI visualization.

Let’s read a newer file and check the structure.

This file’s structure is closer to our source’s description. The difference in schema doesn’t make things easy for us. If all our files have the same schema, we can load and cleanse all the files at once. Ours is a classic case of schema drift, and we must handle it appropriately; otherwise, our ELT (Extract, Load, and Transform) process will fail. We will design our transformation to account for this drift and make it unerring to schema changes.
Schema drift is the case where a source often changes metadata. Fields, columns, and, types are subject to change, addition, or removal.
We will start cleansing by renaming the columns to match our table’s attributes in the database to have a one-to-one mapping between our table and the data. We will achieve this by converting all letters to lowercase and removing space, forwards slash (‘/’), and underscore (‘_’).
# Function to flatten the column names by removing (' ', '/', '_') and converting them to lowercase letters
def rename_columns(rename_df):
  for column in rename_df.columns:
    new_column = column.replace(' ','').replace('/','').replace('_','')
    rename_df = rename_df.withColumnRenamed(column, new_column.lower())
  return rename_df
csvDf = rename_columns(csvDf)
csvDf.printSchema()
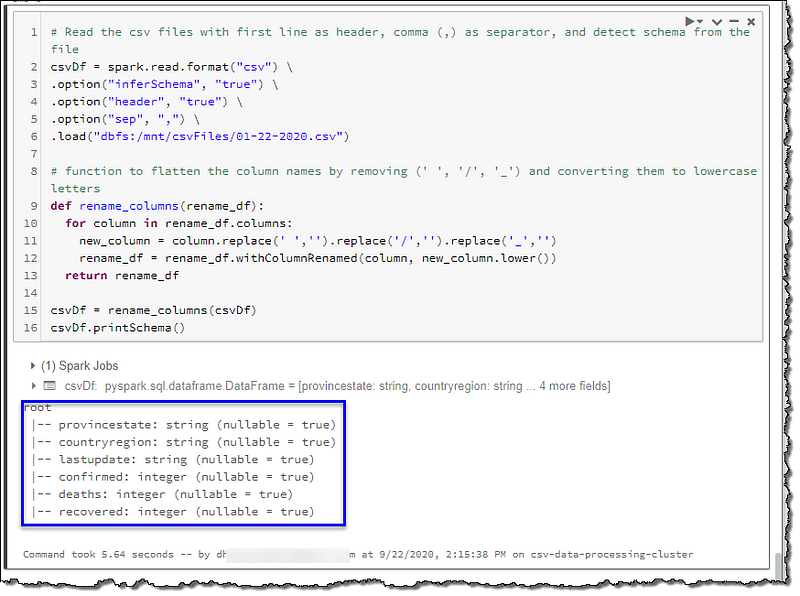
Our column names look much better now. We will add a few new columns to deal with our missing column situation; active, longitude, latitude, and sourcefile. We will use the file name as the value for the sourcefile column. This column will be useful to set up the incremental load of our data into our database.
First, we will rename lat and long column names to latitude and longitude if they exist in the data. Next, we will use lit() from PySpark to add missing active, latitude, and longitude columns with null values and sourcefile with the file name as the column value.
# lit() function to create new columns in our datafram
from pyspark.sql.functions import lit

# Check dataframe and add/rename columns to fit our database table structure
if 'lat' in csvDf.columns:
  csvDf = csvDf.withColumnRenamed('lat', 'latitude')

if 'long' in csvDf.columns:
  csvDf = csvDf.withColumnRenamed('long', 'longitude')

if 'active' not in csvDf.columns:
  csvDf = csvDf.withColumn('active', lit(None).cast("int"))

if 'latitude' not in csvDf.columns:
  csvDf = csvDf.withColumn('latitude', lit(None).cast("decimal"))

if 'longitude' not in csvDf.columns:
  csvDf = csvDf.withColumn('longitude', lit(None).cast("decimal"))

# Add the source file name (without the extension) as an additional column to help us keep track of data source
csvDf = csvDf.withColumn("sourcefile", lit('01-22-2020.csv'.split('.')[0]))

csvDf = csvDf.select("provincestate", "countryregion", "lastupdate", "confirmed", "deaths", "recovered", "active", "latitude", "longitude", "sourcefile")

csvDf.printSchema()

Let’s take a look at the data from the two files we viewed at the beginning of our cleansing activity using display(DATAFRAME).

Both files now give us formatted data in a fixed desired structure and are ready to be inserted in our database. We have dealt with our drifted schema successfully.
So far, we ran our code for two files manually; we should automate this to process files one after the other. We can use Databricks file system utilities to iterate through all the files.
Further reading on Databricks file system utilities
# List all the files we have in our store to iterate through them
file_list = [file.name for file in dbutils.fs.ls("dbfs:{}".format(mountPoint))]

for file in file_list:
  print(file)

We only need to process the files that haven’t been loaded to our database yet (an incremental load). We can find out the name of the last file we loaded by querying the database and tweak our iterator code to ignore the files we have already loaded.
# Find out the last file we loaded into the database
# This will return null if there's no data in the table
lastLoadedFileQuery = "(SELECT MAX(sourcefile) as sourcefile FROM csvData.covidcsvdata) t"

lastFileDf = spark.read.jdbc(url=jdbcUrl, table=lastLoadedFileQuery, properties=connectionProperties)

lastFile = lastFileDf.collect()[0][0]

# List all the files we have in our store to iterate through them
file_list = [file.name for file in dbutils.fs.ls("dbfs:{}".format(mountPoint))]

# Find the index of the file from the list
loadFrom = file_list.index('{}.csv'.format(lastFile)) + 1 if lastFile else 0

# Trim the list keeping only the files that should be processed
file_list = file_list[loadFrom:]
for file in file_list:
  print(file)

Combining and restructuring all the code we’ve written so far will allow us to cleanse our schema drifted files with an incremental load to our database. Give it a try.
# Python/PySpark code for cleansing and transforming schema drifted csv files into relational data with incremental loads in Azure Databricks
# Author: Dhyanendra Singh Rathore

# Define the variables used for creating connection strings
adlsAccountName = "dlscsvdataproject"
adlsContainerName = "csv-data-store"
adlsFolderName = "covid19-data"
mountPoint = "/mnt/csvFiles"

# Application (Client) ID
applicationId = dbutils.secrets.get(scope="CSVProjectKeyVault",key="ClientId")

# Application (Client) Secret Key
authenticationKey = dbutils.secrets.get(scope="CSVProjectKeyVault",key="ClientSecret")

# Directory (Tenant) ID
tenandId = dbutils.secrets.get(scope="CSVProjectKeyVault",key="TenantId")

endpoint = "https://login.microsoftonline.com/" + tenandId + "/oauth2/token"
source = "abfss://" + adlsContainerName + "@" + adlsAccountName + ".dfs.core.windows.net/" + adlsFolderName

# Connecting using Service Principal secrets and OAuth
configs = {"fs.azure.account.auth.type": "OAuth",
           "fs.azure.account.oauth.provider.type": "org.apache.hadoop.fs.azurebfs.oauth2.ClientCredsTokenProvider",
           "fs.azure.account.oauth2.client.id": applicationId,
           "fs.azure.account.oauth2.client.secret": authenticationKey,
           "fs.azure.account.oauth2.client.endpoint": endpoint}

# Mounting ADLS Storage to DBFS
# Mount only if it's not already mounted
if not any(mount.mountPoint == mountPoint for mount in dbutils.fs.mounts()):
  dbutils.fs.mount(
    source = source,
    mount_point = mountPoint,
    extra_configs = configs)

# Declare variables for creating JDBC URL
jdbcHostname = "sql-csv-data-server.database.windows.net"
jdbcPort = 1433
jdbcDatabase = "syn-csv-data-dw"
jdbcTable = "csvData.covidcsvdata"

# Connection secrets from vault
jdbcUsername = dbutils.secrets.get(scope="CSVProjectKeyVault",key="SQLAdmin")
jdbcPassword = dbutils.secrets.get(scope="CSVProjectKeyVault",key="SQLAdminPwd")

# Create JDBC URL
jdbcUrl = "jdbc:sqlserver://{0}:{1};database={2}".format(jdbcHostname, jdbcPort, jdbcDatabase)
connectionProperties = {
  "user" : jdbcUsername,
  "password" : jdbcPassword,
  "driver" : "com.microsoft.sqlserver.jdbc.SQLServerDriver"
}

# import lit() to create new columns in our dataframe
from pyspark.sql.functions import lit

# Function to flatten the column names by removing (' ', '/', '_') and converting them to lowercase letters
def rename_columns(rename_df):
  for column in rename_df.columns:
    new_column = column.replace(' ','').replace('/','').replace('_','')
    rename_df = rename_df.withColumnRenamed(column, new_column.lower())
  return rename_df

# List all the files we have in our store to iterate through them one by one
file_list = [file.name for file in dbutils.fs.ls("dbfs:{}".format(mountPoint))]

# Find out the last loaded file to use as cut-off for our incremental load
lastLoadedFileQuery = "(SELECT MAX(sourcefile) as sourcefile FROM csvData.covidcsvdata) t"
lastFileDf = spark.read.jdbc(url=jdbcUrl, table=lastLoadedFileQuery, properties=connectionProperties)
lastFile = lastFileDf.collect()[0][0]

# Find the index of the file from the list
loadFrom = file_list.index('{}.csv'.format(lastFile)) + 1 if lastFile else 0

# Trim the list keeping only the files that should be processed
file_list = file_list[loadFrom:]

# Iterate through the files
for file in file_list:
  loadFile = "{0}/{1}".format(mountPoint, file)

  # Read the csv files with first line as header, comma (,) as separator, and detect schema from the file
  csvDf = spark.read.format("csv") \
  .option("inferSchema", "true") \
  .option("header", "true") \
  .option("sep", ",") \
  .load(loadFile)

  csvDf = rename_columns(csvDf)

  # Check dataframe and add/rename columns to fit our database table structure
  if 'lat' in csvDf.columns:
    csvDf = csvDf.withColumnRenamed('lat', 'latitude')

  if 'long' in csvDf.columns:
    csvDf = csvDf.withColumnRenamed('long', 'longitude')

  if 'active' not in csvDf.columns:
    csvDf = csvDf.withColumn('active', lit(None).cast("int"))

  if 'latitude' not in csvDf.columns:
    csvDf = csvDf.withColumn('latitude', lit(None).cast("decimal"))

  if 'longitude' not in csvDf.columns:
    csvDf = csvDf.withColumn('longitude', lit(None).cast("decimal"))

  # Add the source file name (without the extension) as an additional column to help us keep track of data source
  csvDf = csvDf.withColumn("sourcefile", lit(file.split('.')[0]))

  csvDf = csvDf.select("provincestate", "countryregion", "lastupdate", "confirmed", "deaths", "recovered", "active", "latitude", "longitude", "sourcefile")

  # Write the cleansed data to the database
  csvDf.createOrReplaceTempView("finalCsvData")
  spark.table("finalCsvData").write.mode("append").jdbc(url=jdbcUrl, table=jdbcTable, properties=connectionProperties)

# Unmount only if directory is mounted
if any(mount.mountPoint == mountPoint for mount in dbutils.fs.mounts()):
  dbutils.fs.unmount(mountPoint)
Conclusion
We looked at our CSV files and realized that they have different schemas and need divergent processing methods before we can load them into our data warehouse. We used PySpark to make a creative solution to process our files incrementally and designed a solution to fit our needs.
Next Steps
If you’re following our series on turning CSV data into Power BI visuals or are interested in learning how to add and execute Databricks notebook in your Data Factory pipeline, please head to our next article to continue the journey.

Leave a comment