A guide on how to setup SQL Server firewall and connect from Databricks using Secret Scopes in PySpark

Azure SQL Servers comes packed with benefits and a twist when you need to access them outside the Azure network. With default settings, the Azure SQL Server firewall denies all access to the server.
This article looks at how to access Azure Synapse Analytics data warehouse from our client computer using SSMS and Databricks without revealing and storing our credentials by leveraging Azure Key Vault-backed Secret Scopes.
Prerequisites
- An active Microsoft Azure subscription
- Azure Databricks Workspace (Premium Pricing Tier)
- Azure Key Vault
- Azure Synapse Analytics data warehouse
- SQL Server Management Studio (SSMS)
If you don’t have prerequisites set up yet, refer to our previous article to get started.
Let’s kick-off by downloading and installing SQL Server Management Studio (SSMS) to connect and query our database from our client.
SQL Server Management Studio is Microsoft’s preferred tool, but you can also use other third-party tools as long as it can connect to a SQL Server database and perform T-SQL queries. However, the steps to connect to the database might differ from this article.
While the download is in progress, let’s set up our Azure SQL Server’s firewall to allow connections from our client and the Databricks.
Set up firewall access
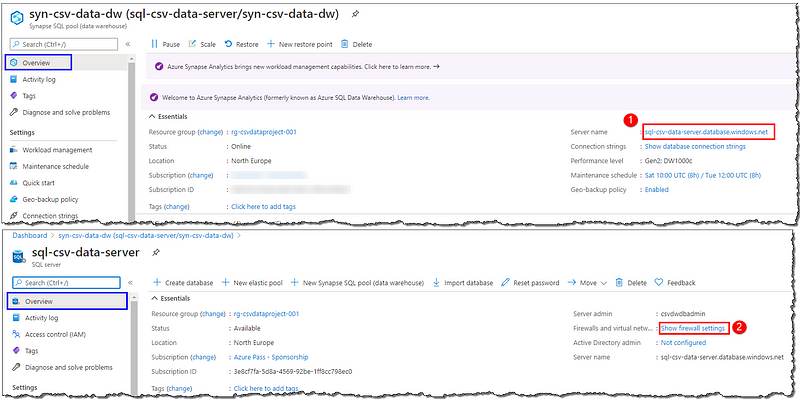
Sign in to the Azure Portal, open your Azure Synapse Analytics’ Overview page and click on the Server name link to go to the underlying SQL server’s page. Select the Show firewall settings link; from here, we can add a single IP address, an address segment, or a virtual network configuration to connect it securely to a specific device or network.
Initially, the sever firewall prevents all access to our Azure SQL Server.
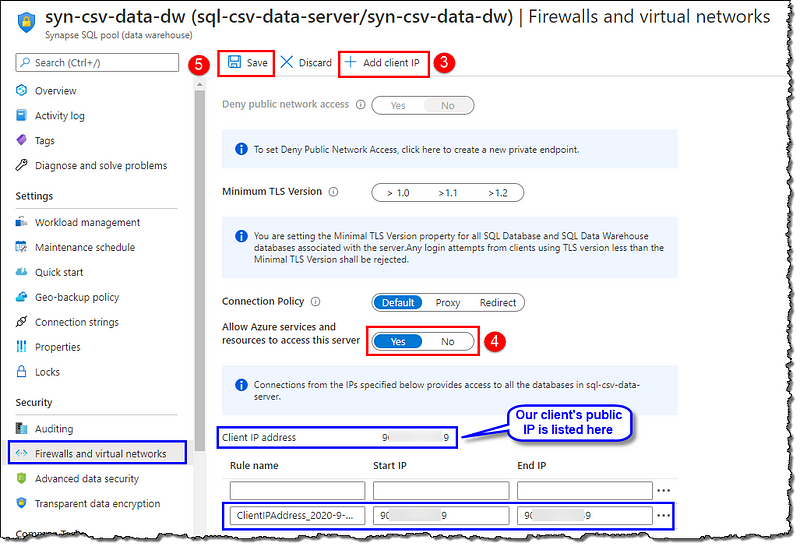
You should be on Firewall and virtual networks page now, click on + Add client IP to automatically add our client’s public IP as a firewall rule. Next, locate and set Allow Azure services and resources to access this server as Yes, this will ensure that our Databricks could access the server without having us to add Databricks’ IP manually. Proceed by Saving the changes.
Connect to Azure Synapse Analytics data warehouse by using SSMS
You can skip this section if you’re here only to see how to connect and access your Azure Synapse Analytics data warehouse from Databricks without storing your credentials.
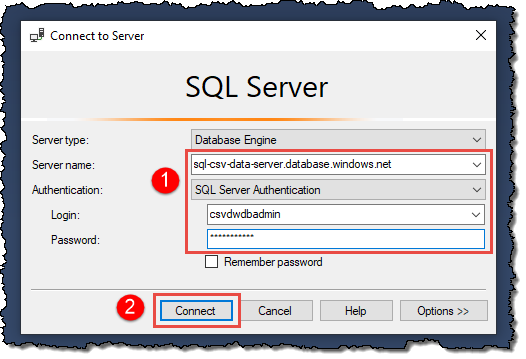
Once we’ve set up the Azure SQL Server’s firewall to allow connections from our client, connecting to our data warehouse is relatively straightforward. Open SSMS on your computer and input the details, as shown.
You can find the Server name on the Overview page of your Synapse Analytics.
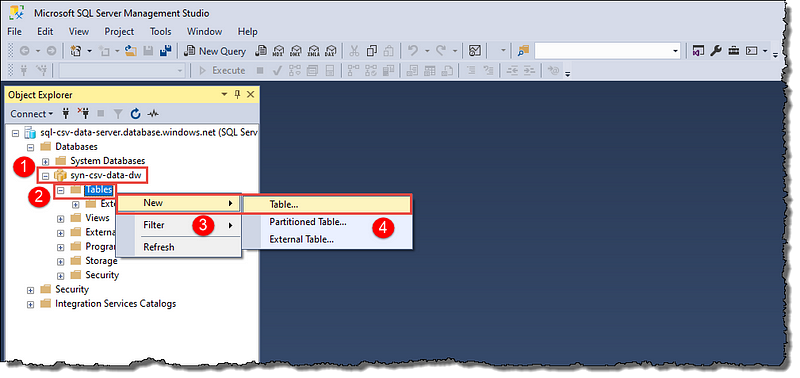
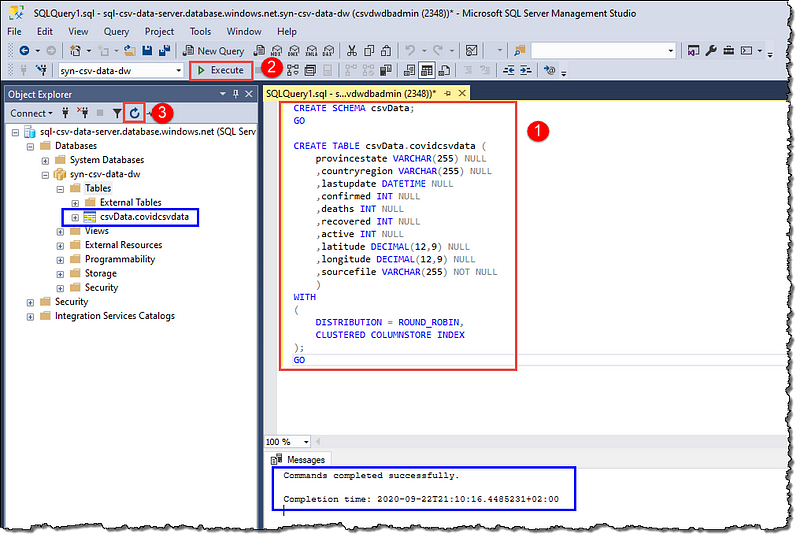
We’re going to create a new schema and a table that we will use later in our journey to visualize covid19 data. Locate your data warehouse in Object Explorer and create a new table.
If you’re following our series on turning CSV data into Power BI visuals, we will need this table to advance our journey.
Use the following SQL to create a schema and the table:
CREATE SCHEMA csvData;
GO

CREATE TABLE csvData.covidcsvdata
(
 provincestate VARCHAR(255) NULL
 ,countryregion VARCHAR(255) NULL
 ,lastupdate DATETIME NULL
 ,confirmed INT NULL
 ,deaths INT NULL
 ,recovered INT NULL
 ,active INT NULL
 ,latitude DECIMAL(12,9) NULL
 ,longitude DECIMAL(12,9) NULL
 ,sourcefile VARCHAR(255) NOT NULL
)
WITH
(
 DISTRIBUTION = ROUND_ROBIN,
 CLUSTERED COLUMNSTORE INDEX
);
GO
Execute the statements and refresh the Object Explorer to see our new table; take your time to explore the various options available with your new table in the Object Explorer. You can quit the SSMS; the rest of the actions will happen in Databricks.
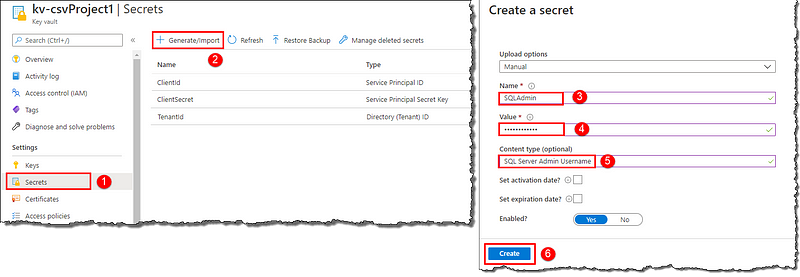
Store SQL Server credentials in the Azure Key Vault
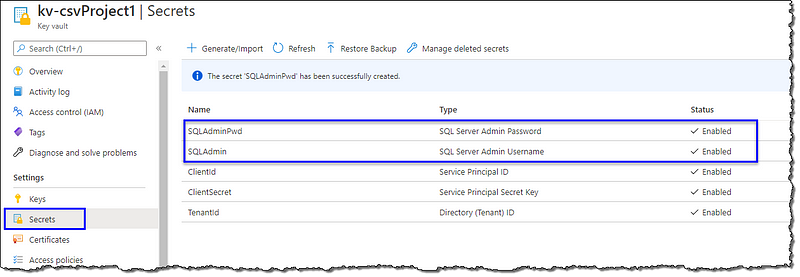
Go to the Azure portal home and open your key vault. Click Secrets to add a new secret; select + Generate/Import. On Create a secret page; give a Name, enter your Azure SQL Server admin name as Value, and a Content type for easier readability. Repeat the creation process for the password. Your vault should have two SQL Server secrets now.
Select Properties, copy the Vault URI, and the Resource ID to notepad; we will need them in the next step.

Create an Azure Key Vault-backed Secret Scope in Databricks
If you’ve followed our another article on creating a Secret Scope for the storage account, you don’t have to perform this step as long as your key vault and Databricks instance in question remains the same.
Go to https://<DATABRICKS-INSTANCE>#secrets/createScope and replace <DATABRICKS-INSTANCE> with your actual Databricks instance URL. Create a Secret Scope, as shown below. This URL is case sensitive.

Vault URI and Resource ID link the Azure Key Vault and Secret Scopes. Any changes you make in your Azure Key Vault are automatically available in your Secret Scope.
Connect to Azure Synapse Analytics data warehouse from Databricks using Secret Scopes
Head to your Databricks cluster and open the notebook we created earlier (or any notebook, if you are not following our entire series).
We will start by defining some variables to create a JDBC connection string, followed by a SQL query (the classic Hello World!). We will push down a SQL query to our data warehouse engine to execute and display the result. You can copy-paste the below code to your notebook or type it on your own. We’re using Python for this notebook. Run your code using controls given at the top-right corner of the cell. Don’t forget to replace the variable assignments with your SQL Server details.
Further reading on Databricks utilities (dbutils) and accessing secrets
# Python code to connect to Azure SQL Databases from Azure Databricks with Screts Scope
# Author: Dhyanendra Singh Rathore

# Declare variables for creating JDBC URL
jdbcHostname = "sql-csv-data-server.database.windows.net" # Replace with your SQL Server name
jdbcPort = 1433 # Replace with your SQL Server port number
jdbcDatabase = "syn-csv-data-dw" # Replace with your database name

# Connection secrets from vault
jdbcUsername = dbutils.secrets.get(scope="CSVProjectKeyVault",key="SQLAdmin") # Replace the scope and key accordingly
jdbcPassword = dbutils.secrets.get(scope="CSVProjectKeyVault",key="SQLAdminPwd") # Replace the scope and key accordingly

# Create JDBC URL
jdbcUrl = "jdbc:sqlserver://{0}:{1};database={2}".format(jdbcHostname, jdbcPort, jdbcDatabase)
connectionProperties = {
  "user" : jdbcUsername,
  "password" : jdbcPassword,
  "driver" : "com.microsoft.sqlserver.jdbc.SQLServerDriver"
}

pushdown_query = "(SELECT 'Hello World' AS TEXTCOL) t"

df = spark.read.jdbc(url=jdbcUrl, table=pushdown_query, properties=connectionProperties)
display(df)

Congratulations! You’ve successfully connected and accessed your Azure Synapse Analytics without typing and storing your credentials in plain text.
Conclusion
We learned how to add an IP to Azure SQL Server’s firewall to allow access within and outside the Azure network. We stored our Azure SQL Server’s admin credentials in Azure Key Vault then we created a Secret Scope in Databricks. We connected and executed a SQL query in Databricks. We also created a schema and a table in the data warehouse using SSMS.
Next Steps
If you’re curious to know about the series we mentioned in our article; please head to the source article to join us:
If you’re intrigued about the table we created in our data warehouse and what purpose it serves, please head to our other articles to know more:
We have another exciting article on mounting and accessing Azure Data Lake Storage Gen2 in Databricks. Here’s a glimpse:

Leave a comment